


Wireless network setup (CLX-3185FW/CLX-3185WK only)_ 4
1. Check whether the USB cable is connected to the machine.
2.Turn on your computer, access point and machine.
3.Insert the supplied software CD into your CD-ROM drive.
•The software CD should automatically run and an installation
window appears.
•If the installation window does not appear, click Start and then Run.
Type X:\Setup.exe, replacing “X” with the letter which represents
your CD-ROM drive. Click OK.
•If you use Windows Vista, Windows 7 or Windows 2008 Server R2
click Start > All programs > Accessories > Run.
Type X:\Setup.exe replacing “X” with the letter which represents
your CD-ROM drive and click OK.
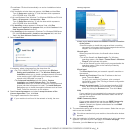
•If the AutoPlay window appears in Windows Vista, Windows 7 or
Windows 2008 Server R2, click Run Setup.exe in Install or run
program field, and click Continue or Yes in the User Account
Control windows.
4.Select the Wireless Setting and Installation option.
5.Read License Agreement, and select I accept the terms of the
License Agreement. Then, click Next.
6.The software searches the wireless network.
If the searching has failed, you may check if the USB cable is
connected between the computer and machine properly, and
follow the instruction on the window.
7.After searching, the window shows the wireless network devices.
Select the name (SSID) of access point you are using, and click
Next.
If you cannot find out the network name you want to choose, or
if you want to set the wireless configuration manually, click
Advanced Setting.
•Enter the wireless Network Name: Type the SSID of
access point you want (SSID is case-sensitive).
•Operation Mode: Select Infrastructure.
•Authentication: Select an authentication type.
Open System: Authentication is not used, and encryption
may or may not be used depending on the need for data
security.
Shared Key: Authentication is used. A device that has a
proper WEP key can access the network.
WPA Personal or WPA2 Personal: Select this option to
authenticate the print server based on WPA Pre-Shared
Key. This uses a shared secret key (generally called Pre
Shared Key passphrase), which is manually configured on
the access point and each of its clients.
•Encryption: Select the encryption. (None, WEP64, WEP128,
TKIP, AES, TKIP AES)
•Network Key: Enter the encryption network key value.
•Confirm Network Key: Confirm the encryption network key
value.
•WEP Key Index: If you are using the WEP Encryption, select
the appropriate WEP Key Index.
The wireless network security window appears when the
access point has security setting.
The wireless network security window appears. The window
may differ according to its security mode, WEP or WPA.
•In case of WEP
Select Open System or Shared Key for the authentication
and enter WEP security key. Click Next.
WEP (Wired Equivalent Privacy) is a security protocol
preventing unauthorized access to your wireless network.
WEP encrypts the data portion of each packet exchanged
on a wireless network using a 64-bit or 128-bit WEP
encryption key.
•In case of WPA
Enter the WPA shared key and click Next.
WPA authorizes and identifies users based on a secret key
that changes automatically at regular intervals. WPA also
uses TKIP (Temporal Key Integrity Protocol) and AES
(Advanced Encryption Standard) for data encryption.
8.The window shows the wireless network setting, and check if settings
are right. Click Next.
•For the DHCP method
If the IP address assignment method is DHCP, check if DHCP is
shown in the window. However, if it shows Static, click Change
TCP/IP to change the assignment method to DHCP.
•For the Static method
If the IP address assignment method is Static, check if Static is
shown in the window. However, if it shows DHCP, click Change
TCP/IP to enter the IP address and other network configuration
values for the machine. Before entering the IP address for the
machine, you must know the computer’s network configuration
information. If the computer is set to DHCP, you must contact the
network administrator to get the static IP address.
Example)
If computer’s network information is as below:
-IP address: 169.254.133.42
-Subnet Mask: 255.255.0.0
Machine’s network information should be as below:
-IP address: 169.254.133. 43 (Use computer’s IP address, with
changed last three digits.)
-Subnet Mask: 255.255.0.0 (Use the computer’s subnet mask.)
-Gateway: 169.254.133.1 (Change the last three digits from IP
address of your machine to 1.)
9.When the wireless network setting is completed, disconnect the USB
cable between the computer and machine. Click Next.
10.The Wireless Network Setting Complete window appears.
Select Yes if you accept the current settings and continue the setup
procedure.
Select No if you want to return to the beginning screen.
Then, click Next.
11.Click Next when the Confirm Printer Connection window appears.
12.Select the components to be installed. Click Next.
After selecting the components, you can also change the machine
name, set the machine to be shared on the network, set the machine
as the default machine, and change the port name of each machine.
Click Next.
13.After the installation is finished, a window asking you to print a test
page appears. If you want to print a test page, click Print a test
page.
Otherwise, just click Next and go to step 16.
14.If the test page prints out correctly, click Yes.
If not, click No to reprint it.
15.To register as a user of the machine in order to receive information
from Samsung, click On-line Registration.
16.Click Finish.