


Scanning_ 4
•ID: admin
•Password: sec00000
If you do not use the SyncThru™ Web Service for five minutes, it
automatically gets logged out.
6. Click Address Book on the top of menu bar.
7. Click E-mail Groups.
8. Click Add Group. Then the Add window appears.
9. Enter the group name you want in the Group Name input area.
Specify the Speed No. from the drop-down list.
10. Select Add individual(s) after this group is created check box.
If you do not want to add individual addresses to the group
address you made, skip this step. You can add individual
addresses next time.
11. Click Apply. Then the Add window appears.
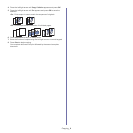
12. Check the addresses you want to add to E-mail Group Address Book
from the Individual Address Book.
13. Click the arrow in the middle. The selected addresses are added in
E-mail Group Address Book.
14. Click Apply.
Using Address Book entries
Speed email numbers
When you are prompted to enter a destination address while sending an
email, enter the speed email number at which you stored the address
you want.
•For a one-digit speed email location, press and hold the corresponding
digit button from the number keypad.
•For a two- or three-digit speed email location, press the first digit
button(s) and then hold down the last digit button.
You can search through memory for an entry by pressing Address
Book (See
"Searching Address Book for an entry" on page 4“).
Group email numbers
To use a group email entry, you need to search for and select it from
memory.
When you are prompted to enter a destination address while sending an
email, press Address Book (See
"Searching Address Book for an
entry" on page 4).
Searching Address Book for an entry
There are two ways to search for an address in memory. You can either
scan from A to Z sequentially or search by entering the first letters of the
name associated with the address.
Searching sequentially through memory
1.Press Address Book until Search & Send appears on the bottom line
of the display and press OK.
2.Press the left/right arrow until the number category you want appears
and press OK.
3.Press OK when All appears.
4.Press the left/right arrow until the name and address you want
appears. You can search upwards or downwards through the entire
memory in alphabetical order.
Searching with a particular first letter
1.Press Address Book until Search & Send appears on the bottom line
of the display and press OK.
2.Press the left/right arrow until the number category you want appears
and press OK.
3.Press the left/right arrow until ID appears and press OK.
4.Enter the first few letters of the name you want appears and press OK.
5.Press the left/right arrow until the name you want appears and press
OK.
Printing Address Book
You can check your address Book settings by printing a list.
1. Press Address Book until Print appears on the bottom of the display.
2. Press OK.
3. Press the left/right arrow until the option you want appears and press
OK.
4. Press OK when Yes appears to confirm printing.
The selected information prints out.
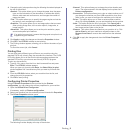
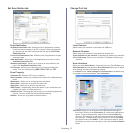
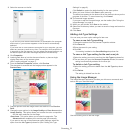
Using Samsung Scan and Fax Manager
If you have installed the printer driver, the Samsung Scan and Fax Manager
program is installed too. For program information and the scanner’s status,
start Samsung Scan and Fax Manager. With this program, you can change
scan settings and add or delete the folders where scanned documents are
saved in your computer.
The Samsung Scan and Fax Manager program can only be used in
the Windows and Mac OS system. If you use the Macintosh, See
"Setting scan information in Scan and Fax Manager" on page 7.
1. From the Start menu, click Control Panel > Samsung Scan and Fax
Manager.
You can open Samsung Scan and Fax Manager by right clicking
the Smart Panel icon in the Windows task bar and selecting Scan
Manager.
2. Select the appropriate machine from the Samsung Scan and Fax
Manager window.
3. Press Properties.
4. The Set Scan Button tab allows you to change the file saving
destination and scan settings, to add or delete application program, and
to change the file format to be saved.
You can change the scanning machine by using the Change Port tab
(Local or Network).
5. When setting is done, press OK.