


Scanning_ 3
3. Press (Scan) on the control panel.
4. Pre
ss the left/right arrow until Scan to Email appears on the bottom line
of the display and press OK.
If you registered login ID (user name) and password on
SyncThru™ Web Service, My Log in ID and Password appear.
Enter the login ID and password to your machine. Go to step 6.
5. Whe
n From appears on the top line of the display, enter the sender’s
email address and press OK.
6. Whe
n DestinationEmail appears on the top line of the display, enter the
recipient’s email address and press OK.
If you have set up Address Book, you can use a
speed button or a speed
email or group email number to retrieve an address from memory (See
"Setting up Address Book" on page 6).
7. To e
nter additional addresses, press OK when Yes appears and repeat
step 6.
To continue to the next step, press the left
/right arrow to select No and
press OK.
8. If the display asks if you want to send the email to your account, press
the left/right arrow to select Yes or No and press OK.
9. Enter
an email subject and press OK.
10. Pr
ess the left/right arrow until the file format you want appears and press
OK or Start (Black or Color).
The machine begins scanning and then sends the email.
11. If
the machine asks if you want to log off your account, press the
left/right arrow to select Yes or No and press OK.
12. Press Stop/Clear to return to ready mode.
Changing the settings for each scan job
Your machine provides you with the following setting options to allow you to
customize your scan jobs.
• Scan
Size: Sets the image size.
• Ori
ginal Type: Sets the original document’s type.
• Reso
lution: Sets the image resolution.
• Scan
Color: Sets the color mode.
• Scan
Format: Sets the file format in which the image is to be saved. If
you select TIFF or PDF, you can select to scan multiple pages.
Depending on the selected scan type, this option may not appear.
To customize the settings before starting a scan job
1. Depe
nding on the model, the operating procedure may differ.
•F
or CLX-3185, CLX-3185N and CLX-3185WK, press Menu on the
control panel.
•F
or CLX-3185FN and CLX-3185FW, press (Scan) and Menu in
order on the control panel.
2. Pre
ss the left/right arrow until Scan Feature appears and press OK.
3. Pre
ss the left/right arrow until the scan type you want appears and press
OK.
4. Pre
ss the left/right arrow until the scan setting option you want appears
and press OK.
5. Pre
ss the left/right arrow until the desired status appears and press OK.
6. Repe
at steps 5 and 6 to change other settings.
7. Whe
n you have finished, press Stop/Clear to return to ready mode.
Changing the default scan settings
To avoid having to customize the scan settings for each job, you can set up
default scan settings for each scan type.
1. D
epending on the model, the operating procedure may differ.
•Fo
r CLX-3185, CLX-3185N and CLX-3185WK, press Menu on the
control panel.
•For CLX-3185FN and CLX-3185FW, press (Scan) and Menu in
order on the control panel.
2. Pres
s the left/right arrow until Scan Setup appears and press OK.
3. Pres
s the left/right arrow until Change Default appears.
4. Pre
ss the left/right arrow until the scan type you want appears and press
OK.
5. Press the left/right arrow until the scan setting option you want appears
and press OK.
6. Pre
ss the left/right arrow until the desired status appears and press OK.
7. R
epeat steps 6 and 7 to change other settings.
8. T
o change the default settings for other scan types, press Back and
repeat from step 5.
9. Pres
s Stop/Clear to return mode.
Setting up Address Book
(CLX-3185FN/CLX-3185FW only)
You can set up address book with the email addresses you use frequently
via SyncThru™ Web Service and then easily and quickly enter email
addresses by entering the location numbers assigned to them in address
book.
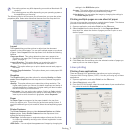
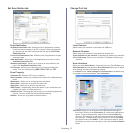
Registering speed email numbers
1. Enter your machine’s IP address as the URL in a browser and click Go
to access SyncThru™ Web Service of your machine.
2. Click Add
ress Book on the menu tab in the top of the website.
3. Th
e Individual Address Book page appears on the middle pane of the
website.
4. Click Add to enter the contact information you want to register.
5. Th
e Add windows appears.
Enter the contact information such as Nam
e, E-mail address and Fax
Number. Also, you can specify the Speed No.
6. Click Apply.
You can also import and export your address book via SyncThru™
Web Service.
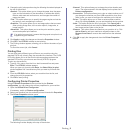
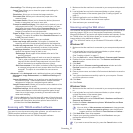
Grouping addresses in Groups Address Book
1. Turn your network-connected computer on and open the web browser.
2. En
ter your machine’s IP address as the URL in a browser.
(Example: http://123.123.123.123)
3. Pres
s Enter or click Go to access the SyncThru™ Web Service.
If necessary, you can change the language in the upper right
corner of the SyncThru™ Web Service.
4. Click Login.on the upper right of the website.
The Lo
gin window appears.
5. T
ype in the ID and Password, and then click Login.
If it is your first time logging into SyncThru™ Web Service, type in the
b
elow default ID and password.