


Wireless network setup (CLX-3185FW/CLX-3185WK only)_ 1
1.wireless network setup
(clx-3185fw/clx-3185wk only)
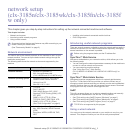
This chapter gives you step-by-step instructions for setting up the wireless network connected machine and software.
This chapter includes:
• Using a wireless network
• Setting a wireless network with WPS button on the control panel
• Setting a wireless network with USB cable
• Setting a wireless network with network cable
• Resetting factory default values
• Completing the Installation
• Troubleshooting
For more information about network environment, network programs
and Installing network connected machine’s driver, refer to following
chapters.
•See "Network environment" on page 1.
•See "Introducing useful network programs" on page 1.
•See "Setting a wireless network with USB cable" on page 3.
•See "Setting a wireless network with network cable" on page 8.
Using a wireless network
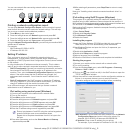
Choosing your network connection
Typically, you can only have one connection between your computer and
the machine at a time. There are two types of network connections to
consider.
• Wire
less network without an access point (Ad-Hoc mode)
• Wire
less network with an access point (Infrastructure mode)
Printing a network configuration report
You can print Network Configuration Report from the machine’s control
panel that will show the current machine’s network settings. This will help
you to set up a network and troubleshoot problems.
1. Pr
ess Menu on the control panel.
2. Pre
ss the left/right arrow until Network appears and press OK.
3. Pre
ss the left/right arrow until Network Info. appears and press OK.
4. Press the left/right arrow until Yes appears and press OK.
Using this Ne
twork Configuration Report, you can find your machine MAC
address and IP address.
For example:
• MAC
Address:00:15:99:41:A2:78
• I
P Address:192.0.0.192
IP addresses
Every device in a network has a unique numerical address called an IP
Address. Your machine came with a Default IP address of 192.0.0.192,
which you can verify by printing out Network Configuration Report or
Configuration Report.
• DHCP IP a
ssignment: Connect your machine to the network, and wait a
few minutes for the DHCP server to assign an IP address to the
machine. Then, print the Network Configuration Report as explained
above. If the report shows that the IP address has changed, the
assignment was successful. You will see the new IP address in the
report.
• Stat
ic IP assignment: Use SetIP program to change the IP address
from your computer (See "Setting IP address" on page 2).
In an office environment, we recommend that you contact a network
administrator to set IP add
ress for your machine.
Wireless network name and Network Key
Wireless networks require higher security. When an access point is first set
up, a network name (SSID), the type of security used and a Network Key
should be created for the network. Check this information before proceeding
with the machine installation.
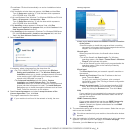
After choosing your configuration, follow the simple directions for your
computer operating system, but first locate the Software CD supplied
with the machine before proceeding.
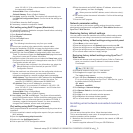
Installing a wireless network with the WPS button
If your machine and an access point (or wireless router) support Wi-Fi
Protected Setup™(WPS), you can easily configure the wireless network
settings by pressing the WPS ( ) button on the control panel (See
"Setting a wireless network with WPS button on the control pa
nel" on
page 2).
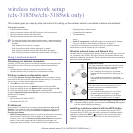
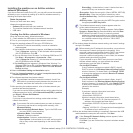
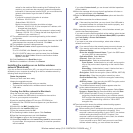
Infrastructure mode
T
his is an environment generally used for homes
and SOHOs. This mode uses an access point to
communicate with the wireless machine.
• See "Installing the machine on a wireless
network with an Access Point (Windows)" on
page 3.
• See "Installing the machine on a wireless
network with an Access Po
int (Macintosh)" on
page 6.
Ad-Hoc mode
T
his mode does not use an access point, the
wireless computer and wireless machine
communicate directly.
• See "Installing the machine on an Ad-Hoc
wireless network (Windows)" on page 5
• See "Installing the machine on an Ad-Hoc
wireless network (Macintosh)" on page 7