


7.
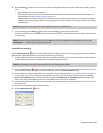
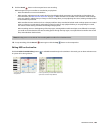
Use the MIDI Step Record dialog to set options for recorded MIDI notes.
a.
Click the Step size button and choose interval between the beginnings of notes.
Select the Tuplet check box to set irregular intervals. For example, to set a triplet interval in 4/4 time, select the Tuplet check
box and choose 3 in time of 4.
b.
Click the Duration button and choose length of the note's sustain. When you choose a duration longer than the step size,
notes will overlap.
c.
To set the note-on velocity for recorded notes, type a value in the Velocity box. If you want to record note-on velocity from
your controller, select the As Played check box.
8.
MIDI messages from your controller are recorded as you play them, and notes are added to an event in the timeline.
Notes:
• MIDI controller adjustments (such as pitch wheel and modulation wheel movements) are not recorded in step record mode.
• If you press a key before releasing the current key, both notes will be recorded at the same timeline position. Release both keys to advance
to the next step.
9.
To stop recording, close the MIDI Step Record dialog or click the Stop button on the transport bar.
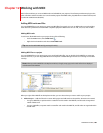
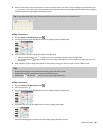
Using MIDI merge recording
Click the MIDI Merge Record button to build a MIDI part by recording repeatedly into a loop region. MIDI merge data is recorded in
real time, and you can add more notes each time recording passes through the loop region.
1.
Connect a MIDI controller to your computer. If you don't have a MIDI controller, you can use the keyboard in the track view (when
in MIDI timeline editing mode) or the keyboard in the Soft Synth Properties window.
Note:
Not all VSTi plug-ins can record using the keyboard in the Soft Synth Properties window.
2.
Select the Arm for Record buttons on the tracks where you want to record. Arming a track enables it for recording. If you don't
arm a track for recording, a new MIDI track will be created when you click the MIDI Step Record button.
3.
Choose a MIDI input device and channel for each armed track. For more information, see Setting up a MIDI controller for recording into
a track on page 190.
4.
Set up any desired MIDI message, velocity, or quantize filters for your armed tracks. For more information, see Processing and filtering
MIDI events on page 198.
5.
Click and drag in the marker bar or a blank area of the timeline to create a loop region.
6.
Select the Loop Playback button.
7.
Select the MIDI Merge Record button.
8.
Position the cursor at the start of the loop region. If you want to record with pre-roll, you can position the cursor before the loop
region.
192 | CHAPTER 12