


Chapter
2
Getting Started
Now that you have an understanding of the interface and controls found in ACID® software, you are ready to begin
learning the techniques needed to pick, paint, and play in ACID projects. In this chapter you will learn the skills that will
allow you to create music, from locating media files to writing the finished project to CD.
Starting projects
Double-clicking the ACID icon on the desktop starts the software. You can immediately begin building your ACID project
using the application’s default project properties. However, you may prefer to customize the project properties prior to
beginning the project.
Setting project properties
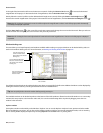
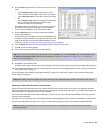
ACID allows you to configure project properties and add summary information prior to beginning a project. Choosing
New from the File menu displays the New Project dialog. This dialog contains two tabs: Summary and Audio. Selecting
the Start all new projects with these settings check box configures the software to use the parameters and information
in both tabs as defaults when starting all subsequent projects.
Note:
You can edit project audio properties and summary information at any time. Choose Properties from the File
menu to display the Project Properties dialog, which contains the identical tabs and parameters as the New Project dialog.
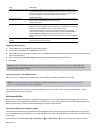
Using the Summary tab
This tab allows you to enter information about the project. These boxes may be left blank or if information exists, you
may change it at any time.
Item Description
Title Enter the name or title of the project.
Artist Enter the name of the narrator, band, or artist(s) being recorded into the
project.
Engineer Enter the name(s) of the people who mixed and edited the project.
Copyright Enter the date and ownership rights of the project.
Comments Enter information that identifies and describes the project.
Universal Product Code/Media Enter the Universal Product Code (UPC) and the Media Catalog Number (MCN)
Catalog Number to be written to your CD for identification purposes.
Start all new projects with these Select this check box if your projects’ requirements do not change or you want
settings consistent settings for future projects.
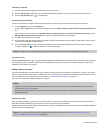
Using the Audio tab
This tab allows you to set different characteristics the project uses to handle the audio.
Item Description
Master bus mode Choose either Stereo for a standard audio project or 5.1 Surround for a surround
project.
Number of additional stereo Enter the number of stereo busses that you want in your project. You may add up to
busses 26 busses. The busses appear in the Mixing Console window. For more information,
see Using audio bus channel strips on page 164.
Sample rate Choose a sample rate from the drop-down list or enter your own rate. The sample rate
range is 2,000 Hz to 192,000 Hz. Higher sample rates result in better quality sound, but
also mean larger audio files.
Bit depth Choose a bit depth from the drop-down list. A higher bit depth results in better quality
sound, but also means larger audio files.
Enable low-pass filter on LFE Select this check box to limit the audio sent to the LFE channel in a 5.1 surround
project. For more information, see Working with 5.1 Surround on page 235.
GETTING STARTED | 29