8-32 Sun Ultra 60 Service Manual • August 2001
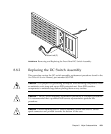
1. Replace the DC switch assembly through the front of the front panel (FIGURE 8-20):
a. Feed the DC switch assembly power cable through the front of the front panel.
b. Using a small flat-blade screwdriver, press the detent tab on one side of the DC
switch assembly while pushing the switch into the front panel from the front.
c. Repeat Step b for the other side of the DC switch assembly.
d. Continue pressing the detent tab on alternate sides and pushing the DC switch
assembly into the front panel until the DC switch assembly locks into the front
panel housing.
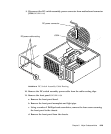
2. Replace the front panel (
FIGURE 8-19):
a. Replace the nameplate onto the front panel, ensuring that the light pipe tabs
are oriented with the nameplate cutouts.
b. Feed the DC switch assembly power cable through the chassis front
(
FIGURE 8-18).
c. Position the front panel onto the chassis. Using a number 2 Phillips-head
screwdriver, replace the four screws securing the front panel to the chassis.
d. Replace the front panel bezel (not illustrated).
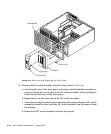
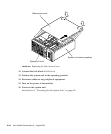
3. Route the DC power cable along the chassis front and side. Secure the power
cable in place using the cable routing clips (
FIGURE 8-18).
4. Connect the DC switch assembly power connector to motherboard connector J3504
(
FIGURE 8-18).
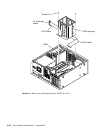
5. Replace the SCSI drive bay (
FIGURE 8-17):
Caution – Prior to replacing the SCSI drive bay, ensure that all cables are clear of
the drive bay area in the chassis.
Note – Hooks at the drive bay base must lock into the bottom slots of the chassis.
a. Slide the SCSI drive bay into the chassis.
Caution – When replacing the screws that secure the SCSI drive bay to the chassis,
pay particular attention not to allow a screw to fall into the chassis.
b. Using a number 2 Phillips-head screwdriver, replace the screws securing the
SCSI drive bay to the chassis.


