Chapter 9 Storage Devices 9-9
9.2.5 Replacing the Diskette Drive
Note – If installing a diskette drive (verses replacing), ensure that the peripheral
power cable and all data cables are properly routed through the clips adjacent to the
drive bay. Route the diskette drive cable through both plastic spring clips installed
adjacent to the hard disk drive bay.
Caution – Use proper ESD grounding techniques when handling components. Wear
an antistatic wrist strap and use an ESD-protected mat. Store ESD-sensitive
components in antistatic bags before placing them on any surface.
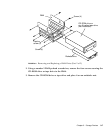
1. Position the diskette drive into the RMA (
FIGURE 9-3).
2. Using a number 2 Phillips-head screwdriver, replace the four screws securing the
diskette drive to the RMA.
3. Replace the RMA.
See Section 9.2.6, “Replacing the RMA” on page 9-9.
9.2.6 Replacing the RMA
Caution – Use proper ESD grounding techniques when handling components. Wear
an antistatic wrist strap and use an ESD-protected mat. Store ESD-sensitive
components in antistatic bags before placing them on any surface.
1. Replace the RMA as follows (
FIGURE 9-2):
a. Position the RMA into the chassis, connect the rear cable connectors as
required.
b. Using a number 2 Phillips-head screwdriver, tighten the captive screws
securing the RMA to the chassis.
2. Replace the front bezel.
3. Connect the AC power cord.
4. Detach the wrist strap.


