Chapter 10 Motherboard and Component Replacement 10-9
10.3.2 Replacing a PCI Card
Caution – Use proper ESD grounding techniques when handling components. Wear
an antistatic wrist strap and use an ESD-protected mat. Store ESD-sensitive
components in antistatic bags before placing them on any surface.
Note – Read the PCI card product guide for information about jumper or switch
settings, slot requirements, and required tools.
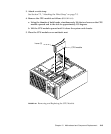
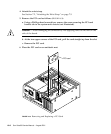
1. Replace the PCI card as follows (
FIGURE 10-3):
a. Position the PCI card into the chassis.
b. Lower the PCI card connector so that it touches its associated PCI card slot on
the motherboard.
c. Guide the PCI card back panel into the chassis backpanel.
d. At the two upper corners of the card, push the card straight down into the slot
until the card is fully seated.
e. Using a Phillips-head screwdriver, replace the screw securing the card bracket
tab to the system unit chassis (not illustrated).
2. Replace the side access cover.
See Section 7.3, “Replacing the Side Access Cover” on page 7-4.
3. Connect the AC power cord.
4. Detach the wrist strap.
5. Connect all cables to the PCI slots.
6. Power on the system unit.
See Section 6.1, “Powering On the System Unit” on page 6-2.


