


6. Adjustments with the ADVANCED menu
100
100
0
0
0
0
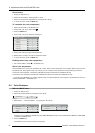
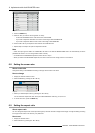
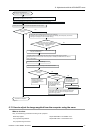
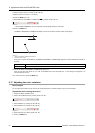
ASPECT
−
USER
ZOOM(V)
HORIZ. POSITION
VERT. POSITION
RASTER POSITION(H)
ZOOM(H)
RASTER POSITION(V)
RESET
OK
Image 6-9
ASPECT-U SER setting supports the COMPUTER1, COMP UTER2, DV I, and HDMI terminals only. Therefore, you cannot select
USER for other terminals.
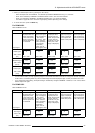
4. Press the ENTER key.
5. Select an item you want to set using the ▲ or ▼ key.
ZOOM(H)
The horizontal im age size is adjusted using the center of the image as the base point. The setting range is 50% to 500% .
ZOOM(V)
The vertical image size is adjusted using the center of the image as the base point. The setting range is 50% to 500% .
HORIZ. POSITION
Use t o adjust the h orizontal position of the projected image. The setting range is -999 to +999.
VERT. POSITION
Use t o adjust the vertical position o f the projected image. The setting range is -999 to +999.
RASTER POSITION(H)
When the s upplied ima ge is not projected on the entire display area, the horizontal location of the projected image c an be adjusted
within the area. The setting range is -960 to +960 (for PHWU-81B), -640 to +640 (for PHWX-81B), or -512 to +512 (for PHXG-91B).
RASTER POSITION(V)
When the supplied image is not projected on the entire display area, the vertical location of the projected image can be adjusted
within the area. The setting range is -540 to +540 (for P HW U-81B ), -400 t
o +400 (for PHWX-81B), or -384 to +384 (for PHXG-91B).
RESET
Press the ENTER key to reset the USER settings.
Important
• Noise may appear on the screen depending on the combination of the type of the video signal being projected and the setting val-
ues of the ZOOM( H ), ZOOM(V ), HO R IZ . PO SITION, VERT. POSITION , RAS TE R POS ITION( H ), and R AS T ER POSITION(V).
In s uch cases, set these values in the range where the image is displayed without noise.
• The adjustable range of each s etting varies de pending on the type of the input signal.
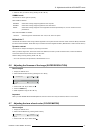
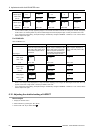
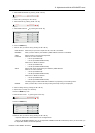
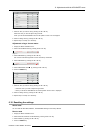
6.11 Saving the setting in the SIGNAL MEMORY
What can be done?
You can save the settings of the SIGNAL menu using the SIGNAL MEMORY.
You can save multiple signal settings for one signal format and switch the method according to use. Up to 8 s ettings can be saved.
Example
Memory number in the SIGNAL MEMO RY
AUTO
1–720p50 2–720p50 3–1080i60 4–xxx
...
8–xxx
SINGAL
menu
ANY SIGNAL 720p50 720p50 1080i60
--
To save the setting in the SIGNAL MEMORY
1. Display the SIGNAL menu.
R5905597 PHXX SERIES 28/01/2014
61