


Faxing |
257
4 Enter the speed dial number using the number pad, and then tap Done.
NOTE:
• Using the asterisk (*) in the first digit, you can send a document to multiple locations. For
example, if you enter 00*, you can send a document to the locations registered between 001
and 009.
5 Tap , and then check and change the fax settings.
See "Fax Settings."
6 Tap Send.
When the document is loaded on the document glass, the screen prompts you for
another page.
• If you want to scan another document, replace the document with a new
document, and then tap Continue.
• When you have finished loading documents, tap Done.
The fax number stored in the speed dial location is dialed. The document is sent when
the remote fax machine answers.
Group Dialing
If you frequently send a document to several destinations, you can create a group of
these destinations and set them under a one-digit group dial location. This enables you
to use a group dial number setting to send the same document to all the destinations in
the group.
NOTE:
• You cannot include one group dial number within another group dial number.
Setting Group Dial
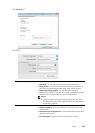
1 Press the (Information) button.
2 Tap the Tools tab Admin Settings Phone Book Groups.
If Panel Lock Control is set to Enable, enter the password. See "Panel Lock."
3 Select the desired group dial number.
If the desired group dial number is not displayed, tap or to scroll through the
screen.
If a group dial number is already set, the screen shows the name and the number of
entries stored in that group dial number.
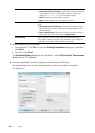
4 Tap the Enter Group Name text box.
5 Enter the name, and then tap OK.
6 Tap Add from Phone Book.
NOTE:
• The fax number needs to be registered before you can select Add from Phone Book.
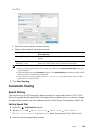
7 Select the desired speed dial number.
If the desired speed dial number is not displayed, tap or to scroll through the
screen.