MFJ-1278B MULTI-MODE APPENDIX C AUDIO OUTPUT
AUDIO OUTPUT CALIBRATION
The transmit audio output levels of MFJ-1278B Radio Port 1 and Radio Port 2 both are
factory set to 250 mV. You may find it necessary to set the output levels differently to match
your radio specifications, then you should follow the procedure given in this appendix.
Note that the user can set the audio levels of both Radio Ports independently. Adjust R157
for Radio Port 1 and R158 for Radio Port 2. Both controls are accessible on the left side of
the MFJ-1278B. There are two access holes located on the left rear side of the MFJ-1278B.
It is not necessary to remove the cover to make the output level adjustments.
In most cases the user can set the audio output level of the MFJ-1278B, by simply monitoring
the transmitted audio with a connecting station. However, if you require a more precise
audio output level setting, then use the procedure given here.
Audio Output Level Adjustment Procedure
1. After the cmd: prompt sign, set the MFJ-1278B to VHF packet mode by typing:
MODE VP <CR>
2. Verify that you have the MFJ-1278B connected to Radio Port 1, by typing:
RADIO 1 <CR>
3. Enter the following command to activate the calibration mode:
CALI <CR>
4. Press the "K" key on the computer keyboard to activate the MFJ-1278B modulator
circuit. The PTT LED on the front panel of the MFJ-1278B should illuminate.
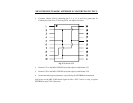
5. Place an oscilloscope probe at the right pin of JMP7. The signal on the scope will be
approximately 4 volts p-p.
6. Verify that the voltage on pin 9 of U16 is -5 Vdc. If it is +5 Vdc instead of -5 Vdc,
press the space bar one time. The voltage should now be -5 Vdc. If not, then press and
hold the space bar and see if the voltage at U16 Pin 9 changes at all Set U16 Pin 9 to -5
Vdc.
7. Move the probe to J9 pin 1 (TX audio). Adjust R157 for a signal of 250 mV p-p. This
should be near mid
-
range on R157. Or set it to a level recommended by your radio


