


This soft copy for use by IBM employees only.
•
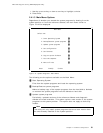
Use the arrow keys to select the parameter to modify.
•
Press Enter to edit the parameter.
•
Use the arrow keys to select the new value or press Esc to quit.
•
Press Enter to validate the new value.
When finished:
•
Press Esc to quit the SCSI Advanced Configuration options menu.
•
Press Esc to quit the Configuration menu.
•
Use the arrow keys to select the SCSI Disk Utilities.
•
Press Enter.
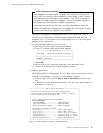
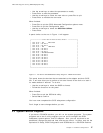
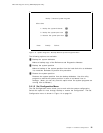
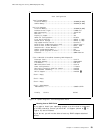
A panel similar to the one in Figure 11 will appear.
┌──────────────── Select SCSI ID Disk and Press <Enter> ──────────────┐
│ │
│ SCSI ID #0 : IBM DPES-31080 │
│ SCSI ID #1 : No device │
│ SCSI ID #2 : No device │
│ SCSI ID #3 : IBM CDRM 00203 │
│ SCSI ID #4 : No device │
│ SCSI ID #5 : No device │
│ SCSI ID #6 : No device │
│ SCSI ID #7 : AHA-2940/AHA-2940W │
│ SCSI ID #8 : No device │
│ SCSI ID #9 : No device │
│ SCSI ID #10 : No device │
│ SCSI ID #11 : No device │
│ SCSI ID #12 : No device │
│ SCSI ID #13 : No device │
│ SCSI ID #14 : No device │
│ SCSI ID #15 : No device │
│ │
└──────────────────────────────────────────────────────────────────────┘
Figure 11. PC Server 320 SCSISelect Utility Program - DASD Information
This panel shows the devices that are attached to the adapter and their SCSI
IDs. It will also allow you to perform a low-level format of the disk or to scan it
for media defects if desired. To do this:
•
Use the arrow keys to select the DASD to format.
•
Follow the directions on the panel.
When finished:
•
Press Esc to quit the SCSI disk utility.
•
Select Yes to confirm.
You have now completed the SCSI subsystem configuration.
Don′t forget to save changes before you exit.
2.4 System Partition Programs
If you have a PCI/MCA machine, you will run the system programs. The system
programs are a set of utility programs you can use to configure the SCSI
subsystem, system options, and I/O adapters. Also, you can use them to set
passwords, change the date and time, and test the server. In effect, they are the
equivalent of Setup, EISA Configuration and SCSISelect for a PCI/EISA machine.
Chapter 2. Hardware Configuration 17