


This soft copy for use by IBM employees only.
In write-through mode, the data is written directly to the disk and no
acknowledgement is sent until the operation is complete. This is the default.
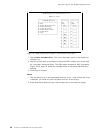
2.5.1.7 Initializing the Array
If you are using RAID level 1 or 5, you must select Initialize logical drives for
proper operation. This sets the drive to a predetermined state. Any data existing
on the drive is overwritten with zeros, and the corresponding parity is initialized
to the correct value.
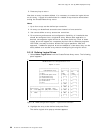
1. Select Initialize/synchronize array from the main menu.
2. Select Initialize logical drive.
3. Select the logical drive you want to initialize by pressing the spacebar.
4. Press Enter to start the initialization.
5. Select Yes to confirm.
2.5.1.8 Backup/Restoring the Configuration
The array configuration is stored on EEPROM on the adapter. It is very
important to back up this configuration on a diskette. If the adapter ever needs
to be replaced, the configuration can be restored to the new adapter without the
need to reconfigure the array. Otherwise, the array would need to be redefined
and your data would be lost.
This is important not only at installation time but whenever the array
configuration changes. For example, if a hot-spare drive is defined and
subsequently, a drive fails and the hot-spare is enabled, the array configuration
is updated. If you are unable to restore the configuration
exactly
as it was
before, it would have the same effect as re-initializing the arrays: all data would
be lost.
Backup Recommended
We
strongly
recommend that the configuration be backed up.
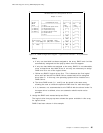
To back up the configuration:
1. Select Advanced functions from the Main Menu.
2. Select Backup config. to diskette.
3. Press Enter.
4. Enter the filename you want for backup (CONFIG is the default).
5. Insert a diskette to hold the backup file.
6. Press Enter.
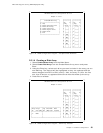
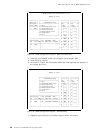
To restore the configuration:
1. Select Advanced functions from the Main Menu.
2. Select Restore config. from diskette.
3. Press Enter.
4. Enter the filename you used for backup.
5. Insert the diskette used for backup.
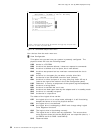
6. Press Enter.
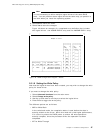
A panel similar to the one in Figure 41 on page 49 will appear. This shows
you the date when the backup was performed.
48 PC Server and Windows NT Integration Guide