


Network Basics
WorkCentre 6400 Multifunction Printer
User Guide
31
Assigning the Printer an IP Address
Before your computer can communicate with the printer on a network, the printer must be assigned a
unique IP address.
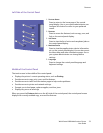
Accessing Quick Setup Home
Quick Setup Home is a setup utility that will help you set up your printer from the control panel.
Note: The first time the printer is turned on, the printer display will prompt you to set the date and
time, and to select default paper sizes. The display will then enter Quick Setup Home. If the time
and date are already set up, or the printer does not prompt you for these settings:
1. Log in as a system administrator. Press the Log In/Out button (user name: admin, default
password: 1111).
2. Press the Machine Status button.
3. Select the Tools tab.
4. Select Device Settings.
5. Select Quick Setup Home from the list.
From here, you can access the IP Address Setup Wizard.
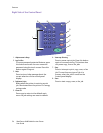
IP Address Setup Wizard
The IP address setup wizard will help you configure the printer’s IP address settings for your network.
1. Select IP Address Settings from the list.
2. Select Enable for IPv4 or IPv6, and then select Next.
Note: IPv6 is the newest standard protocol for the internet. If you are unsure which IP setting to
use, enable both. If you change IPv6 settings, the printer will reboot when you close the Quick
Setup Home window.
3. Choose a method for assigning the IP address.
To allow the IP address to be assigned automatically using DHCP:
a. Select Get IP Address from a DHCP Server, and then select Next.
b. The screen will display the acquired TCP/IP settings.
c. If the DHCP server was unable to assign an IP address automatically, contact your system
administrator.
d. Select Next to continue.
To manually assign the IP address:
a. Select Use a Static IP Address, and then select Next.