


Adding, Removing, and Modifying Telephones 127
3 Optionally, clear all check boxes associated with autodiscovering devices.
4 Enable Auto Discover Telephones, and then click Apply.
5 Optionally, enable the Auto Add Phones to Call Pickup Group 0 check
box.
Regardless of whether you select this check box, you can change the call
pickup group for any telephone later. See “
Call Pickup” on page 264 for
information about Call Pickup Groups.
6 Click OK.
7 For each telephone that you want to autodiscover:
a Remove the telephone from the packing box.
b Connect the phone to power and the network according to the
instructions in the telephone packing sheet or the NBX Installation
Guide.
c Wait until an extension number appears in the telephone’s display
panel.
You can now disconnect the telephone and move it to its destination. The
telephone retains its extension and button mappings.
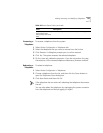
Adding a Telephone Manually
To add a new telephone manually:
1 From the NBX NetSet main menu, click
Device Configuration > Telephones.
2 Click
Add. The Add Telephones dialog box appears.
3 Fill in the fields with the appropriate values. See Table 23
.
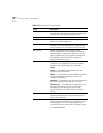
Table 23 Add Telephone Dialog Box Fields
Field Description
MAC Address The hardware address assigned at the factory to each device.
To find the
MAC Address of an NBX Business Telephone,
look at the label on the bottom of the telephone.
When you type the address, use the format: XX:XX:XX:XX:XX,
where each X represents a hexadecimal digit (0–f).
If you are configuring a pcXset client, the MAC address is the
address of the network interface card in the computer that
hosts the pcXset client.