


Auto Attendant 319
To configure telephone buttons, select NBX Messaging > Auto Attendant
> Menu Tree. See the Help for procedure on configuring telephone
buttons for Auto Attendant actions.
Activating Changes
After you modify a greeting or prompt (or any Auto Attendant setting),
you must activate these changes in the Auto Attendant before they
become effective. The characters “!>” next to an Auto Attendant in the
list on the Auto Attendant tab indicate that an Auto Attendant must be
activated.
This procedure is very important. If you change an Auto Attendant,
clicking Apply does not implement the changes.
To activate changes, select NBX Messaging > Auto Attendant > Activate.
See the Help for more information on activating changes to Auto
Attendants.
Managing Auto
Attendants
This section describes additional ways in which you can manage Auto
Attendants.
■ Modifying an Auto Attendant
■ Removing an Auto Attendant
■ Restoring Auto Attendant Greetings
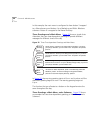
Enter Submenu Puts the caller into a submenu of options. When you assign
the Enter Submenu action to a button and then click Apply,
a down-arrow button appears to the right of the row. Click
this down-arrow button to configure the submenu that you
want to associate with the main menu. The entry in the
Task Description field for this button becomes the submenu
name.
Submenu button actions include “Exit menu” to allow
callers to return to the next highest menu. Otherwise,
submenu button actions are identical with main menu
button actions.
Each menu can have up to 20 levels of submenus.
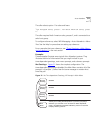
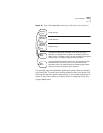
For an example that uses submenus, see “Three Greetings, a
Main Menu, and a Submenu” on page 314.
Value — Not used
Table 68 Button Actions (continued)
Action Description