


Activating Option 184 385
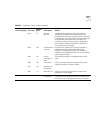
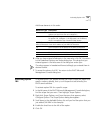
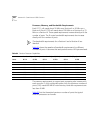
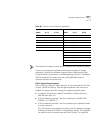
Add these elements in this order:
6 After you have entered all elements in the new value, click OK. You return
to the Predefined Options and Values dialog box. The values that you
entered appear in the Value area of the dialog box under Byte.
The values appear in hexadecimal format although you entered them in
decimal format.
7 To accept the values, click OK. You return to the DHCP Microsoft
Management Console dialog box.
Activating Option
184
To activate option 184, decide whether you want to apply the option to a
specific scope or globally, that is, to all scopes that are served by the
DHCP server software.
To activate option 184 for a specific scope:
1 In the left pane of the DHCP Microsoft Management Console dialog box,
find the scope that you want. Then highlight Scope Options.
2 Right click Scope Options, and, from the menu that appears, select
Configure Options. The Scope Options dialog box appears.
3 Scroll down in the Available Options list until you find the option that you
just added (184 NBX in this example).
4 Enable the check box to the left of the option.
5 Click OK.
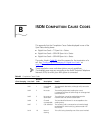
What You Type Description
1 Enter 1 as the only suboption code for option 184. (Some
options can have more than one suboption.)
4 The length of the argument that applies to this suboption.
For option 184, suboption 1, the argument is an IP address,
which is composed of four numerical fields (octets).
NOTE: The next four fields use 10.234.1.254 as the sample IP address of the
NBX Call Processor. Enter the IP address of your NBX Call Processor.
10 The first octet in the IP address of the NBX Call Processor.
234 The second octet in the IP address of the NBX Call Processor.
1 The third octet in the IP address of the NBX Call Processor.
254 The fourth octet in the IP address of the NBX Call Processor.