


176 CHAPTER 3: DEVICE CONFIGURATION
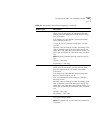
Mapping the Attendant Console Access Buttons
To map the NBX 1105 Attendant Console Access buttons:
1 Select NBX NetSet >
Device Configuration > Attendant Console.
2 Select the Attendant Console you want.
3 Click Button Mappings.
4 To map the buttons that you want, follow these steps:
a Select the appropriate column of buttons. Click 1-50 to select columns
A through E, or 51 through 100 to select columns F through J. (This
choice emulates the function of the Shift button on the physical
Attendant Console.)
b Click the letter (A through J) that corresponds to the column of
buttons that you want to map.
c Map the buttons for the column that you selected using the
drop-down list boxes. Table 31
describes each mapping type.
5 Click Apply for the changes to take effect.
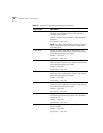
Table 31 Attendant Console Button Mappings
Button Type Description
Default If you select this setting for a button and click Apply, the
default value defined for the telephone group is applied
to this button.
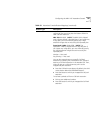
Example: You have set a button on a user’s telephone as
a hunt group login button, but the user no longer wants
to use the button this way.
You select Default for the button and click Apply.
If the normal setting for the button (defined for the
corresponding telephone group) is PSD12 (personal
speed dial 12) that setting becomes active on the button.
Number — Not used.
Prty (Priority) — Not used.
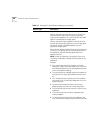
Other Lets you assign any feature code to a button.
Number — Enter the feature code number in this field.
Prty (Priority) — Not used.
Example: On the NBX 100, use Other to map the
personal speed dials from 11–99. In the Number field,
enter an extension from the personal speed dial
extension range. PSD 11 corresponds to extension 610.