


Advanced Configuration and Management Guide
6. Select Enable next to Encapsulation.
7. Click the Add button to save the changes to the device’s running-config file.
8. Select the Save
link at the bottom of the dialog. Select Yes when prompted to save the configuration change
to the startup-config file on the device’s flash memory.
Configuring an IP Tunnel
IP tunnels are used to send traffic through routers that do not support PIM or DVMRP multicasting. IP multicast
datagrams are encapsulated within an IP packet and then sent to the remote address. Routers that are not
configured for PIM or DVMRP route that packet as a normal IP packet. When the DVMRP or PIM router at the
remote end of the tunnel receives the packet, the router strips off the IP encapsulation and forwards the packet as
an IP Multicast packet.
NOTE: An IP tunnel must have a remote IP interface at each end. Also, for IP tunneling to work, the remote
routers must be reachable by an IP routing protocol.
NOTE: Multiple tunnels configured on a router cannot share the same remote address.
EXAMPLE:
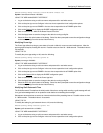
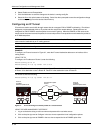
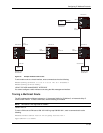
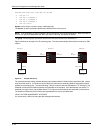
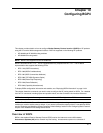
To configure an IP tunnel as seen in Figure 9.7, enter the IP tunnel destination address on an interface of the
routing switch.
USING THE CLI
To configure an IP address on Router A, enter the following:
HP9300(config)# int e1
HP9300(config-if-1)# ip tunnel 192.3.45.6
NOTE: The IP tunnel address represents the configured IP tunnel address of the destination router. In the case
of Router A, its destination router is Router B. Router A is the destination router of Router B.
For Router B, enter the following:
HP9300(config-if-1)# ip tunnel 192.58.4.1
Router A
Router B
HP 9308M
Non-Multicast Capable
Routers
HP 9308M
Router
Router
Router
Router
IPTunnelIPTunnel IPTunnel
Mulitcast Capable Router
192.58.4.1 192.3.45.6
Mulitcast Capable Router
...
Group
Member
Group
Member
Group
Member
...
Group
Member
Group
Member
Group
Member
Figure 9.7 IP in IP tunneling on multicast packets in a unicast network
USING THE WEB MANAGEMENT INTERFACE
1. Log on to the device using a valid user name and password for read-write access.
2. Click on the plus sign next to Configure in the tree view to expand the list of configuration options.
3. Click on the plus sign next to DVMRP in the tree view to expand the list of DVMRP option links.
9 - 50