


Configuring IPX
6. Enter the network number.
7. Select the frame type from the pull down menu.
8. Enable NetBIOS if desired.
9. Click the Add button to apply the changes to the device’s running-config file.
10. Select the Save
link at the bottom of the dialog. Select Yes when prompted to save the configuration change
to the startup-config file on the device’s flash memory.
Define and Assign a Forward Filter and Group
You can define a forward filter to allow a remote IPX client access to a restricted-access server. You can define up
to 32 forward filters on a routing switch. Once you define the filter, you assign the filter to an interface by placing
the filter in a forward filter group.
NOTE: A network number and frame type must be defined for the IPX interface before defining a forward filter.
EXAMPLE:
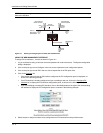
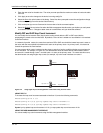
To allow IPX Client 1 on network 100 access to the finance server in Network 300 (Figure 14.1), define the
following forward filter at the Global Level and then assign the filter to port 1/3 as a filter group.
NOTE: You can assign forward filters to either the input or output traffic on an interface.
USING THE CLI
HP9300(config)# ipx forward-filter 1 permit 100 008012345678 03030303 1 451
HP9300(config)# int e1/3
HP9300(config-if-1/3)# ipx forward-filter-group in 1
Syntax: ipx forward-filter <filter-id> permit | deny <source-network-number> | any <source-node-number> | any
<destination-network-number> | any <destination-node-number> | any <destination-socket-number> | any
Syntax: ipx forward-filter-group in | out <filter-id>
NOTE: When you define filters, the network number for a server is its internal network number. The node number
for a client is the client’s MAC address. The value 1 represents a server.
USING THE WEB MANAGEMENT INTERFACE
EXAMPLE:
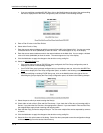
To allow IPX Client 1 on network 100 access to the finance server in Network 300 (Figure 14.1), define the
following forward filter at the Global Level and then assign it to port 1/3 as a filter group.
1. Log on to the device using a valid user name and password for read-write access. The System configuration
dialog is displayed.
2. Click on the plus sign next to Configure in the tree view to expand the list of configuration options.
3. Click on the plus sign next to IPX in the tree view to expand the list of IPX option links.
4. Click on the Forward Filter
link.
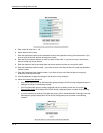
• If the device does not have an IPX forward filter configured, the IPX Forward Filter configuration panel is
displayed, as shown in the following example.
• If an IPX forward filter is already configured and you are adding a new one, click on the Add Forward
Filter link to display the IPX Forward Filter configuration panel, as shown in the following example.
• If you are modifying an existing IPX forward filter, click on the Modify button to the right of the row
describing the filter to display the IPX Forward Filter configuration panel, as shown in the following
example.
14 - 5