


Advanced Configuration and Management Guide
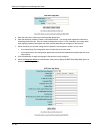
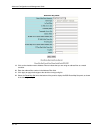
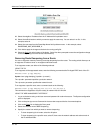
• If you are modifying an existing BGP address filter, click on the Modify button to the right of the row
describing the filter to display the BGP Address Filter configuration panel, as shown in the following
example.
5. Enter the filter ID in the ID field. You can specify a number from 1 – 100.
6. Select the action you want the routing switch to perform if the filter is true:
• If you select Deny, the router denies the route from entering the BGP4 table if the filter match is true.
• If you select Permit, the router permits the route into the BGP4 table if the filter match is true.
7. Enter the network prefix in the Prefix field. If you specify “any”, all networks match the filter.
8. Enter the prefix masking bits in the Prefix Masking Bits field. The prefix masking bits indicate the bits in the
prefix that the filter compares. The filter disregards the bits for which the mask contains zeros.
9. Enter the mask in the Prefix Mask field. If you specify “any”, all masks match the filter.
10. Enter the masking bits for the network mask in the Prefix Mask Masking Bits field.
11. Click the Add button to apply the changes to the device’s running-config file.
12. Repeat steps 5 – 11 for each address filter.
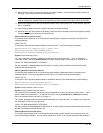
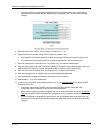
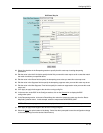
13. In the tree view, under BGP in the Configure section, click on the Route Map Filter
link to display the BGP
Route Map Filter panel.
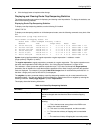
• If the device does not have any BGP route map filters configured, the BGP Route Map Filter
configuration panel is displayed, as shown in the following example.
• If BGP route map filters are already configured and you are adding a new one, click on the Route Map
Filter link to display the BGP Route Map Filter configuration panel, as shown in the following example.
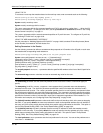
• If you are modifying an existing BGP route map filter, click on the Modify button to the right of the row
describing the filter to display the BGP Route Map Filter configuration panel, as shown in the following
example.
10 - 72