


Advanced Configuration and Management Guide
For example, when you configure parameters for redistributing routes into RIP, one of the optional parameters is a
route map. If you specify a route map as one of the redistribution parameters, the router will match the route
against the match statements in the route map. If a match is found and if the route map contains set statements,
the router will set attributes in the route according to the set statements.
To create a route map, you define instances of the map. Each instance is identified by a sequence number. A
route map can contain up to 50 instances.
To define a route map, use the procedures in the following sections.
Entering the Route Map Into the Software
USING THE CLI
To add instance 1 of a route map named “GET_ONE” with a permit action, enter the following command.
HP9300(config)# route-map GET_ONE permit 1
HP9300(config-routemap GET_ONE)#
Syntax: route-map <map-name> permit | deny <num>
As shown in this example, the command prompt changes to the Route Map level. You can enter the match and
set statements at this level. See “Specifying the Match Conditions” on page 10-61 and “Setting Parameters in the
Routes” on page 10-66.
The <map-name> is a string of characters that names the map. Map names can be up to 32 characters in length.
You can define up 50 route maps on the router.
The permit | deny parameter specifies the action the router will take if a route matches a match statement.
• If you specify deny, the routing switch does not advertise or learn the route.
• If you specify permit, the routing switch applies the match and set statements associated with this route map
instance.
The <num> parameter specifies the instance of the route map you are defining. Each route map can have up to
50 instances.
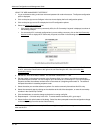
USING THE WEB MANAGEMENT INTERFACE
1. Log on to the device using a valid user name and password for read-write access. The System configuration
panel is displayed.
2. Click on the plus sign next to Configure in the tree view to expand the list of configuration options.
3. Click on the plus sign next to BGP in the tree view to expand the list of BGP option links.
4. Click on the Route Map Filter
link to display the BGP Route Map Filter panel.
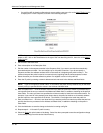
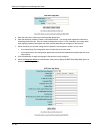
• If the device does not have any BGP route map filters configured, the BGP Route Map Filter
configuration panel is displayed, as shown in the following example.
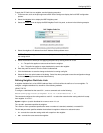
• If BGP route map filters are already configured and you are adding a new one, click on the Route Map
Filter link to display the BGP Route Map Filter configuration panel, as shown in the following example.
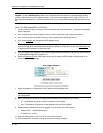
• If you are modifying an existing BGP route map filter, click on the Modify button to the right of the row
describing the filter to display the BGP Route Map Filter configuration panel, as shown in the following
example.
10 - 60