


Advanced Configuration and Management Guide
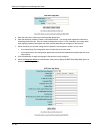
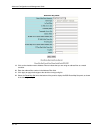
16. Optionally enter a local preference in the Local Preference and also select the checkbox in front of the field.
The default local preference is 100. You can set the preference to a value from 0 – 4294967295.
17. Optionally enter a metric (MED) in the Metric field and also select the checkbox in front of the field. The
default MED value is 0. You can set the preference to a value from 0 – 4294967295.
18. Optionally enter the Next Hop IP address in the NextHop field and also select the checkbox in front of the
field.
19. Optionally enter a weight in the Weight field and also select the checkbox in front of the field. You can
specify a weight value from 0 – 4294967295.
20. Click the Apply button to apply the changes to the device’s running-config file.
21. Select the Save
link at the bottom of the dialog. Select Yes when prompted to save the configuration change
to the startup-config file on the device’s flash memory.
Using a Table Map To Set the Tag Value
Route maps that contain set statements change values in routes when the routes are filtered by the route map.
For inbound route maps (route maps that filter routes received from neighbors), this means that the routes are
changed before they enter the BGP4 route table.
For tag values, if you do not want the value to change until a route enters the IP route table, you can use a table
map to change the value. A table map is a route map that you have associated with the IP routing table. The
routing switch applies the set statements for tag values in the table map to routes before adding them to the route
table.
To configure a table map, you configure the route map, then identify it as a table map. The table map does not
require separate configuration. You create it simply by calling an existing route map a table map. You can have
one table map.
NOTE: Use table maps only for setting the tag value. Do not use table maps to set other attributes. To set other
route attributes, use route maps or filters.
USING THE CLI
To create a route map and identify it as a table map, enter commands such as following. These commands create
a route map that uses an address filter. For routes that match the address filter, the route map changes the tag
value to 100. This route map is then identified as a table map. As a result, the route map is applied only to routes
that the routing switch places in the IP route table. The route map is not applied to all routes. This example
assumes that address filter 11 has already been configured.
HP9300(config)# route-map TAG_IP permit 1
HP9300(config-routemap TAG_IP)# match address-filters 11
HP9300(config-routemap TAG_IP)# set tag 100
HP9300(config-routemap TAG_IP)# router bgp
HP9300(config-bgp-router)# table-map TAG_IP
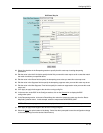
USING THE WEB MANAGEMENT INTERFACE
1. Log on to the device using a valid user name and password for read-write access. The System configuration
panel is displayed.
2. Use the Web management procedures in “Defining Route Maps” on page 10-59 to create the route map.
3. Click on the plus sign next to Configure in the tree view to expand the list of configuration options.
4. Click on the plus sign next to BGP in the tree view to expand the list of BGP option links.
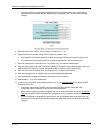
5. Click on the General
link to display the BGP configuration panel.
6. Select the route map name from the Table Map field’s pulldown menu.
7. Click the Apply button to apply the changes to the device’s running-config file.
10 - 68