


Advanced Configuration and Management Guide
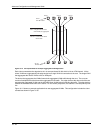
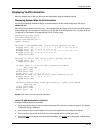
HP9300F(config-vlan-103)# exit
HP9300F(config)# vlan 104 by port
HP9300F(config-vlan-104)# tagged ethernet 2/1
HP9300F(config-vlan-104)# untagged ethernet 1/4
HP9300F(config-vlan-104)# exit
HP9300F(config)# vlan 105 by port
HP9300F(config-vlan-105)# tagged ethernet 2/1
HP9300F(config-vlan-105)# untagged ethernet 1/5
HP9300F(config-vlan-105)# exit
HP9300F(config)# write memory
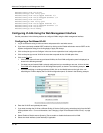
Configuring VLANs Using the Web Management Interface
Use the procedures in the following sections to configure VLANs using the Web management interface.
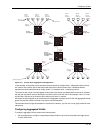
Configuring a Port-Based VLAN
1. Log on to the device using a valid user name and password for read-write access.
2. If you have not already enabled OSPF, enable it by clicking on the Enable radio button next to OSPF on the
System configuration dialog, then clicking Apply to apply the change.
3. Click on the plus sign next to Configure in the tree view to expand the list of configuration options.
4. Click on the plus sign next to VLAN in the tree view to expand the list of VLAN option links.
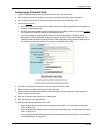
5. Click on the Port
link.
• If the device does not have any port-based VLANs, the Port VLAN configuration panel is displayed, as
shown in the following example.
• If at least one port-based VLAN is already configured and you are adding a new one, click on the Add
Port VLAN link to display the Port VLAN configuration panel, as shown in the following example.
• If you are modifying an existing port-based VLAN, click on the Modify button to the right of the row
describing the VLAN to display the Port VLAN configuration panel, as shown in the following example.
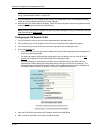
6. Enter the VLAN ID and optionally the name.
7. If you want to assign the VLAN to a different Quality of Service (QoS) priority, select the priority from the QoS
field’s pulldown menu. For more information, see “Changing a Layer 2 Port-Based VLAN’s Priority” on page
2-12.
8. Select Enable to Disable next to Spanning Tree to enable or disable the feature on this VLAN.
9. Select the virtual interface (router interface) if applicable.
16 - 50