


Installation and Getting Started Guide
NOTE: If the ACL is a forwarding ACL, the action forwards or drops the traffic. If the ACL is a management
access ACL, the action permits or denies management access.
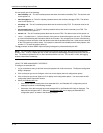
7. Enter the source information. You can enter the source IP address and network mask or the host name.
• If you enter the address, you also must enter the network mask. To specify “any”, enter “0.0.0.0”.
• If you enter a host name instead of an IP address, when you click Add to add the ACL, the Web
management interface sends a DNS query for the address. For the query to be successful, the device
must have network access to a DNS server and the server must have an Address record for the host. In
addition, the device must be configured with a DNS domain name and the IP address of the DNS server.
8. If you specified the Deny action, optionally enable logging by selecting the Log checkbox. If you enable
logging for this ACL entry, the software generates Syslog entries for traffic that the ACL denies.
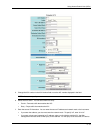
9. Select the IP Access Group
link from the tree view.
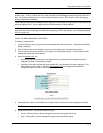
• If the device does not already have some ACLs applied to interfaces, the IP Access Group configuration
panel is displayed, as shown in the following example.
• Otherwise, if the device already has some ACLs applied to interfaces, the IP Access Group table is
displayed. Select the Add
link to display the IP Access Group configuration panel, as shown in the
following example.
10. Select the Slot (if you are configuring a Chassis device) and port from the Slot and Port pulldown menus.
11. Specify the traffic direction to which the ACL applies. You can select one or both of the following:
• In Bound – The ACL applies to traffic received on the port from other devices.
• Out Bound – The ACL applies to traffic this HP device queues for transmission on the port.
12. Enter the ACL number in the ACL Number field.
NOTE: You cannot specify a named ACL.
13. Click the Add button to save the ACL and the association of the ACL with an interface to the device’s running-
config file.
14. Select the Save
link at the bottom of the dialog. Select Yes when prompted to save the configuration change
to the startup-config file on the device’s flash memory.
NOTE: You also can access the dialog for saving configuration changes by clicking on Command in the tree
view, then clicking on
Save to Flash.
3 - 8