


99-00984-20-B0
19 | CHAPTER 3 – USING YOUR UX60 PROJECTOR
Adjusting Projector Settings
You can access the projector settings by pressing the remote control’s Menu button
and accessing the on-screen display. You can also access these settings by
connecting a network cable to the projector, as described on page 24.
NOTE
There are no projector menu options on the ECP. Keep your remote control in a
safe place, as the ECP is not meant as a substitute for the remote control.
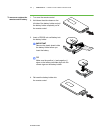
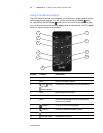
To adjust settings using
the remote control
1. Press the Power button once to turn on the projector.
2. Press the Input button to select an input source.
3. Press the Menu button to display the projector menu.
a. Press the Left or Right button to access a menu option, move between
menu option settings and select number value settings.
b. Press the Up or Down button to select the relevant menu option or
adjustment.
c. Press Enter to accept the selected mode or option you choose.
4. Press the Hide button to hide or display the source image.
5. Press the Mode button to cycle through display modes: Bright Classroom, Dark
Classroom, sRGB, User or SMART Presentation.
6. Press the Mute button to temporarily mute or un-mute the audio output from your
speakers (not included).
7. Press the Up or Down arrows in the volume region to adjust the volume.
8. Press the Power button twice to turn off the projector.
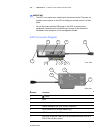
Extended Control Panel (ECP)
Understanding Your ECP Functions
Your ECP gives you control of basic options while you’re next to the interactive
whiteboard system. Additionally, you can connect some peripheral device sources (or
outputs) directly to the ECP, as described on page 30. You can use the ECP’s Power
button (or, alternatively, the remote control’s Power button) to turn on or turn off
the projector system. You can use the Input button (or, alternatively, the remote
control’s Input button) to switch sources on the projector.