


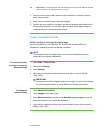


64 | CHAPTER 5 – MAINTAINING AND TROUBLESHOOTING YOUR SMART BOARD
685ix INTERACTIVE WHITEBOARD SYSTEM
99-00984-20-B0
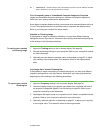
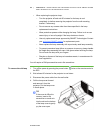
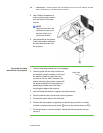
5. Use a Phillips screwdriver to
loosen the two captive screws
from the bottom of the lamp
module.
NOTE
Captive screws can’t be
removed, but they must
be loose. Don’t try to
remove the screws.
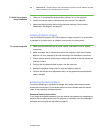
6. Use the handle on the bottom
of the lamp module to slide out
the lamp and remove it from
the projector.
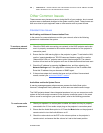
To put the new lamp
module into the projector
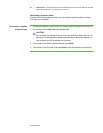
1. Take the new lamp module out of its packaging.
2. Carefully place the new lamp module into
the projector using the handle on the top of
the module. When you guide the lamp
module into its slot, hold it vertically, and
ensure the power plug makes contact with
the power receptacle on the projector by
squeezing the power end of the lamp
module gently against the projector.
3. Use the Phillips screwdriver to tighten the captive screws.
4. Carefully slide the lamp cover back onto the projector.
5. Connect the power cable to the wall outlet.
6. Confirm that the projector is operating and that the lamp module is correctly
installed by pressing the power button once on the remote control or ECP.
7. Put the old lamp in a secure container. Handle the old lamp gently until you
recycle it.
Power Plug