


99-00984-20-B0
65 | CHAPTER 5 – MAINTAINING AND TROUBLESHOOTING YOUR SMART BOARD
685ix INTERACTIVE WHITEBOARD SYSTEM
To finish the projector
lamp installation
1. Once you’ve completed the projector lamp change, turn on the projector.
2. Access the service menu to reset the lamp hour counter. See page 66.
3. Reactivate the projector’s alert e-mails and lamp warnings if they’ve been
deactivated. See page 91 and page 97.
Slipping Projector Images
Like all mechanical systems, the UX60 projector’s image may slip if it is moved often,
or installed in a location prone to vibration (such as next to a heavy door).
To correct image slip 1. Make sure the installation wall is plumb, square, and doesn’t move or vibrate
excessively.
2. Make sure there are no obstructions behind the projector’s wall mount bracket,
and that it is firmly secured to the wall according to the installation instructions.
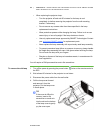
3. Ensure that the screws connecting the adjustment module to the wall bracket are
securely in place.
4. Confirm that all cables are held in place, with the cable clip.
5. Realign the projector image. See To align the image on page 43.
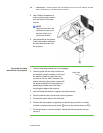
6. Confirm that the two silver adjustment locks, on the green and blue adjustment
knobs, are tight.
Accessing the Service Menu
To prevent tampering or unintentional change, only system administrators should
access the service menu. Do not share the service menu access code with casual
users of the interactive whiteboard system.
Password Retrieval Instructions
If you forget the projector password, you can retrieve the password by accessing the
projector service menu directly from the projector, or optionally, from the web page’s
password retrieval option as described on page 91.