


10
Fax setup
After completing all steps in the Setup Guide, use the instructions in this chapter to
complete your fax setup. Please keep your Setup Guide for later use.
In this chapter, you will learn how to set up your HP all-in-one so that faxing works
successfully with equipment and services you might already have on the same phone
line as your HP all-in-one.
Before you begin setting up your HP all-in-one for faxing, determine which kind of phone
system your country/region uses. The instructions for setting up your HP all-in-one for
faxing differ depending whether you have a serial or parallel phone system.
● If the connector type on your shared telephone equipment (modems, phones, and
answering machines) does not allow a physical connection to the "2-EXT" port on
your HP all-in-one and instead must be connected at the telephone wall jack, you
probably have a serial-type telephone system. Check the table below to make sure
that your country/region does not appear in this list. If you are unsure which kind of
telephone system you have (serial or parallel), check with your telephone
company. This type of phone system uses a 4-wire phone cord to connect the
HP all-in-one to the telephone wall jack.
● If your country/region is listed in the table, you probably have a parallel-type
telephone system. This type of phone system uses a 2-wire phone cord to connect
the HP all-in-one to the telephone wall jack.
Argentina
Australia Brazil
Canada Chile China
Colombia Greece India
Indonesia Ireland Japan
Korea Latin America Malaysia
Mexico Philippines Poland
Portugal Russia Saudi Arabia
Singapore Spain Taiwan
Thailand USA Venezuela
Vietnam
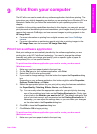
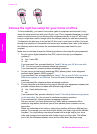
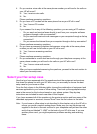
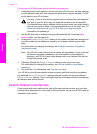
Tip You can also check the end of the phone cord that came in the box with your
HP all-in-one. If the phone cord appears to have two wires, you have a 2- wire
phone cord. If the phone cord has four wires, you have a 4-wire phone cord. The
graphic below shows the differences between the phone cords.
User Guide 51
Fax setup