


Using the driver to print to a PostScript file
Using the driver to print to a PostScript file is a three-step process. First,
change your printer setup, then use your program to create the file, and finally
reset your printer setup for normal printing.
Step 1: Changing your printer setup to print to a PostScript file
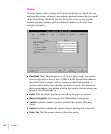
1 From the Program Manager, open the Control Panel and double-click the Printers icon.
The Printers dialog box appears.
2 If it is not already selected, select the name of the PostScript printer that you are using
from the Installed Printers list.
3 Select Connect.
The Connect dialog box appears.
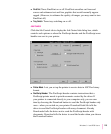
4 Select FILE from the Ports list box.
You may have to scroll through the list to find this selection.
5 Choose OK to close the Connect dialog box and return to the Printers dialog box.
6 Choose Setup.
The driver Setup dialog box appears.
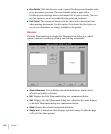
7 After changing (or confirming) your printer settings, choose OK to close the dialog box.
Note: Choose settings in the PostScript Options dialog box that will produce
a file that prints correctly on the destination printer. For example, select the
“Use PostScript Level 2 Features” option if you are sure that you will be
printing the file only on Level 2 printers, such as the LaserWriter 12/640 PS.
If you plan to use a printer that does not support binary communication,
disable the “Send Data in Binary” option. Selecting the “Optimize for
Portability” option creates PostScript files that print successfully from
different programs on a wide variety of printers and imaging devices; it is
recommended that you enable this option.
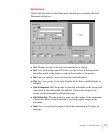
8 Choose Close to close the Printers dialog box.
9 Choose Exit from the Settings menu to close the Control Panel.
Your computer is now set up to create PostScript files when you choose the
Print command from a Windows program.
222
Chapter 7