


2 Select Product Options from the list and press Enter.
A list of product options appears. If the Mac OS NLM is installed and
operating properly, a NW-MAC option will be available.
3 Select the NW-MAC option and press Enter.
A list of configuration files appears.
4 From the list, select the file SYS:\SYSTEM\ATPS.CFG and press Enter.
A prompt appears, asking if you want to create a new file.
5 Type
y
and press Enter.
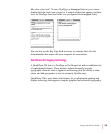
An empty window appears, providing an area in which to enter configuration
information.
6 Enter a line of configuration information for each LaserWriter 12/640 PS printer. (Enclose
the printer name and zone in quotation marks.)
Example
“Sales Printer:Ethernet Zone”
This example identifies the printer “Sales Printer” located in the zone
“Ethernet Zone.”
You can include a
-h option at the end of the line to instruct ATPS to make
the printer unavailable for direct Mac OS printing; that is, the printer will be
accessible only through ATPS queues.
Example
“Sales Printer:Ethernet Zone” -h
Note: Other ATPS options are available for configuring the printer. See
Novell’s NetWare for Macintosh documentation for more information on these
options.
7 Press Esc to quit editing.
A prompt appears, asking if you want to save your changes.
8 Type
y
and press Enter.
The list of configuration files reappears.
326
Appendix B