


Step 2: Printing to a PostScript file
1 Start the program and open the document for which you want to create a PostScript file.
2 If necessary, select the Print Setup command from the File menu, change the settings as
appropriate, and select OK.
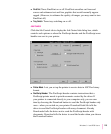
3 Choose the Print command from the File menu.
Your program’s Print dialog box appears.
4 Choose OK.
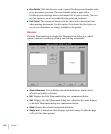
A dialog box appears that asks you to name the file.
5 Enter a pathname and filename for the file.
If you don’t specify a pathname, the PostScript file is placed in your program’s
default directory.
6 Choose OK.
The PostScript file is created, and you are returned to your program.
Step 3: Restoring your printer setup options
After creating PostScript files, you need to restore your original printer setup
options before you can use your printer again.
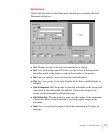
1 From the Program Manager, open the Control Panel.
2 Double-click the Printers icon.
The Printers dialog box appears.
3 If it is not already selected, select the printer model from the Installed Printers list.
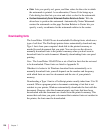
4 Choose Connect.
The Connect dialog box appears.
5 In the Ports list box, select the port to which your PostScript printer is connected.
6 Choose OK.
The Connect dialog box closes, and you are returned to the Printers
dialog box.
223
Windows 3.1 and DOS Users