


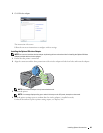


Dell Printer Configuration Web Tool
NOTE: For details about using WPA-Enterprise-AES, WPA2-Enterprise-AES, or WPA-Enterprise-TKIP, see "Using Digital
Certificates."
1
Ensure that the printer is turned off and the wireless adapter is connected to the printer.
2
Connect the printer to the network with an Ethernet cable.
For details about how to connect the Ethernet cable, see "Connecting Printer to Computer or Network."
3
Turn on the printer.
4
Launch the
Dell Printer Configuration Web Tool
by entering the IP address of the printer in your web browser.
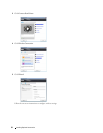
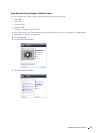
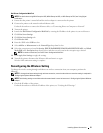
5
Click
Print Server Settings
.
6
Click
Print Server Settings
tab.
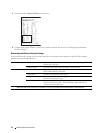
7
Click
Wireless LAN
.
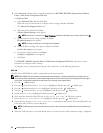
8
Enter the SSID in the
SSID
text box.
9
Select
Ad-Hoc
or
Infrastructure
in the
Network Type
drop-down list box.
10
Select the encryption type from
No Security
,
WEP, WPA-PSK-TKIP
,
WPA-PSK-AES/WEP2-PSK AES
, and
Mixed
Mode PSK
in the
Encryption
drop-down list box, and then set each item for the encryption type selected.
NOTE: For details on each item, see "Dell™ Printer Configuration Web Tool."
11
Click
Apply New Settings
to apply the settings.
12
Turn off the printer, disconnect the Ethernet cable and turn it on again.
Wireless LAN connection setting is complete.
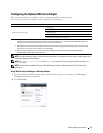
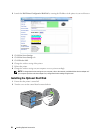
Reconfiguring the Wireless Setting
To change the wireless setting through an Ethernet or wireless connection from your computer, perform the
following.
NOTE: To change the wireless setting through wireless connection, ensure that the wireless connection setting is completed in
"Configuring the Optional Wireless Adapter."
NOTE: The following settings are available when the network mode is set to infrastructure in "Configuring the Optional Wireless
Adapter."
1
Check the IP address of the printer.
For details about how to check the IP address of the printer, see "Verifying the IP Settings."
Installing Optional Accessories 57