


206
Printing
NOTE:
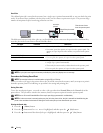
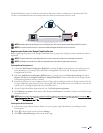
To register the printer to the Google Cloud Print service, the printer needs to be connected to the Internet.
NOTE:
Google Cloud Print supports only IPv4 connection.
NOTE:
If the printer is connected to a network that uses a proxy server, you need to specify the settings in Proxy Server from the
Dell Printer Configuration Web Tool. For more information, see "Proxy Server."
NOTE:
Acquire a Google account and a Gmail address in advance.
Enabling Google Cloud Print on the Printer
When using the operator panel
1
Press the
(Menu)
button.
2
Press the button until
Admin Settings
is highlighted, and then press the
(Set)
button.
3
Press the button until
Network
is highlighted, and then press the
(Set)
button.
4
Press the button until
Protocols
is highlighted, and then press the
(Set)
button.
5
Press the button until
Google Cloud Print
is highlighted, and then press the
(Set)
button.
6
Ensure that
Enable
is highlighted, and then press the
(Set)
button.
7
When the message
This Setting Becomes Effective after Restart
is displayed, press the
(Back)
button.
8
Turn off the printer, and turn it on again to apply the settings.
When using the Dell Printer Configuration Web Tool
1
Launch the
Dell Printer Configuration Web Tool
by entering IP address of the printer in your web browser. For
more information, see "Setting Up the Dell Printer Configuration Web Tool" and "Starting the Dell Printer
Configuration Web Tool."
2
When the
Dell Printer Configuration Web Tool
opens, go to the pages in the
Print Server Settings
tab. Click
Port
Settings
. In
Port Status
, select the
On
check box for
Google Cloud Print
.
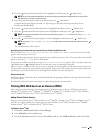
Selecting the Version of the Google Cloud Print Service
Select the version of the Google Cloud Print service from either version 1.1 or version 2.0.
Google Cloud Print version 1.1 sends the print data to the printer via Internet. For this version, the printer needs to
be connected to the Internet.