


Appendix A Accessories|ASDA-AB Series
B-2
Revision January 2009
Installation
All electrical equipment, including AC servo drives, will generate high-frequency/low-frequency noise and will
interfere with peripheral equipment by radiation or conduction when in operation. By using an EMI filter with
correct installation, much of the interference can be eliminated. It is recommended to use Delta’s EMI filter to
have the best interference elimination performance.
We assure that it can comply with following rules when AC servo drive and EMI filter are installed and wired
according to user manual:
EN61000-6-4 (2001)
EN61800-3 (2004) PDS of category C2
EN55011+A2 (2007) Class A Group 1
General Precaution
To ensure the best interference elimination performance when using Delta’s EMI filter, please follow the
guidelines in this user manual to perform wiring and/or installation. In addition, please also observe the
following precautions:
EMI filter and AC servo drive should be installed on the same metal plate.
Please install AC servo drive on same footprint with EMI filter or install EMI filter as close as possible to
the AC servo drive.
All wiring should be as short as possible.
Metal plate should be grounded.
The cover of EMI filter and AC servo drive or grounding should be fixed on the metal plate and the
contact area should be as large as possible.
Choose Suitable Motor Cable and Precautions
Improper installation and choice of motor cable will affect the performance of EMI filter. Be sure to observe
the following precautions when selecting motor cable.
Use the cable with shielding (double shielding is the best).
The shielding on both ends of the motor cable should be grounded with the minimum length and
maximum contact area.
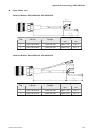
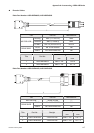
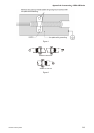
Remove any paint on metal saddle for good ground contact with the plate and shielding (Please refer to
Figure 1 on page B-3).
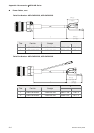
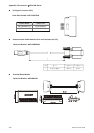
The connection between the metal saddle and the shielding on both ends of the motor cable should be
correct and well installed. Please refer to Figure 2 on page B-3 for correct wiring method.