


16 HCI disassembly/assembly ENWW
Explanation
This section explains how to disassemble and reassemble the MFP. When disassembling and
reassembling the MFP, follow the precautions given below.
CAUTION ● Be sure the power cord has been unplugged from the wall outlet.
● The disassembled parts must be reassembled following the disassembly
procedure in reverse unless otherwise specified.
● Care should be taken not to lose small parts. Care should also be taken not
to install small parts in wrong places.
● Do not operate the MFP before installing all the disassembled parts
completely.
● Removal of some screws is prohibited in this section. Never loosen them.
Paper feed section
Cleaning the paper dust removing
brush
CAUTION If HCI is connected to the
MFP, make sure that the
MFP power plug is
disconnected from the
power outlet.
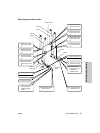
Procedure
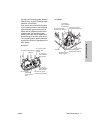
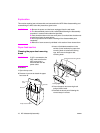
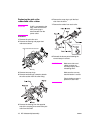
1 Open the top cover.
2 Remove six screws to detach the paper
feed cover B.
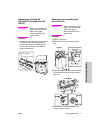
3 Insert a flat bladed screwdriver in the
cavities (in two locations) for paper dust
removing brush to release the locking
lugs, then remove the paper dust
removing brush.
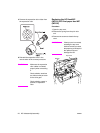
4 Clean the paper dust removing brush
using a blower brush.
5 Reinstall the above parts following the
removal steps in reverse.
Top
cover
Screws
Screws
Paper feed cover B
Paper dust removing brush
Cavity
Locking lugs