


26 HCI disassembly/assembly ENWW
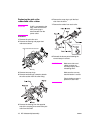
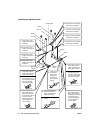
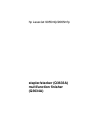
7 Remove the detent pin for gear B from the
up/down pulley shaft.
8 Remove the E-ring and bearing to remove
gear C.
9 Remove the bearing behind gear C.
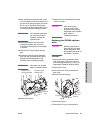
10 Remove the E-ring to remove the
up/down gear.
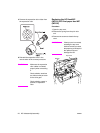
11 Remove the detent pin for up/down gear
from the up/down pulley shaft.
12 Remove the E-ring to remove gear D.
13 Remove the E-ring to remove the
remaining paper detection gear.
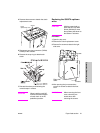
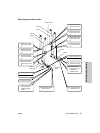
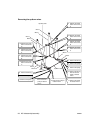
14 Remove four relay connectors (CN780,
CN781, CN782, and CN783) to
disconnect the wiring harness from the
up/down motor mounting assembly.
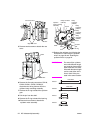
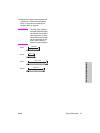
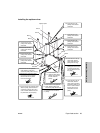
15 Remove the E-ring to remove the
bearing.
16 Remove the six screws to remove the
up/down motor mounting assembly.
Bearing
Gear C
E-ring
E-ring
Up/down pulley shaft
Gear B
Gear A
Pin
Relay connector
(CN780)
Relay
connector
(CN781)
Relay connector
(CN782)
Up/down
motor mounting
assembly
Relay
connector
(CN783)
E-ring
Bearing
Up/down pulley shaft
E-ring
Up/down
gear
Pin
E-ring
Gear D
Remaining paper
detection gear
Up/down motor mounting assembly
Bearing
E-ring
Screws
Screws