


18 Post insertion disassembly/assembly ENWW
This section explains how to disassemble and reassemble the MFP. When disassembling and
reassembling the MFP, follow the precautions given below.
CAUTION ● Be sure the power cord has been unplugged from the wall outlet.
● The disassembled parts must be reassembled following the disassembly
procedure in reverse unless otherwise specified.
● Care should be taken not to lose small parts. Care should also be taken not
to install small parts in wrong places.
● Do not operate the MFP before installing all the disassembled parts
completely.
● Removal of some screws is prohibited in this section. Never loosen them.
External section
Removing/reinstalling the
external covers
CAUTION Make sure that the power
cord of the MFP is
unplugged from the power
outlet.
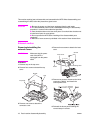
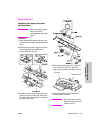
Procedure
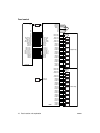
1 Remove cap on the top cover.
2 Remove four screws to detach the top
cover.
3 Remove one screw to detach the
connector cover.
4 Remove three screws to detach the lower
cover.
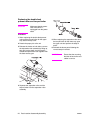
5 Remove two screws, disconnect the inline
connector (CN232), and detach the
control panel cover.
6 Reinstall the above parts following the
removal steps in reverse.
Top cover
Screws
Cap
Lower cover
Connecting cover
Screw
Screws