


3 Tests and Diagnostics 3.2 Executing the Diagnostic Test
3-4 PORTEGE A200 Maintenance Manual (960-499)
3.2 Executing the Diagnostic Test
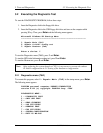
To start the DIAGNOSTIC PROGRAM, follow these steps:
1. Insert the Diagnostics disk in the floppy disk drive.
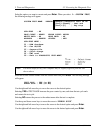
2. Insert the Diagnostics disk in the USB floppy disk drive and turn on the computer while
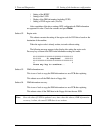
pressing U key. Then, press Enter and the following menu appears.
Microsoft Windows XX Startup Menu
---------------------------------------------------------
1. Repair Main (T&D)
2. Repair initial config set
3. Repair Heatrun (T&D)
Enter a choice: 1
To start the Diagnostics menu (T&D), press 1 and Enter.
To start the H/W initial information setting tool, press 2 and Enter.
To start the Heatrun test, press 3 and Enter.
Note: After replacing the system board or CPU, it is necessary to execute the subtest
01 Initial configuration in 3.3 Setting of the hardware configuration.
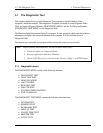
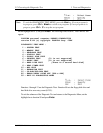
3.2.1 Diagnostics menu (T&D)
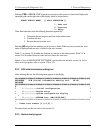
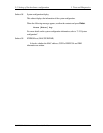
To execute this program, select 1- Repair Main (T&D) in the startup menu, press Enter.
The following menu appears.
TOSHIBA personal computer XXXXXX DIAGNOSTICS
version X.XX (c) copyright TOSHIBA Corp. 20XX
DIAGNOSTICS MENU :
1 - DIAGNOSTIC TEST
2 – ONLY ONE TEST
3 -
4 - HEAD CLEANING
5 - LOG UTILITIES
6 - RUNNING TEST
7 - FDD UTILITIES
8 - SYSTEM CONFIGURATION
9 - EXIT TO MS-DOS