


Printing using Windows
Xerox® WorkCentre® 3215/3225
User Guide
104
4. Select Save. The name appears in the Overlay List box.
5. Select OK.
Note: The overlay document size must be the same as the documents you print with the overlay.
Do not create an overlay with a watermark.
6. Select OK on the Advanced tab page.
7. Select OK in the main Print window.
8. An Are you Sure? message displays. Select Yes to confirm.
Using a Page Overlay
1. Select the required overlay from the Overlay drop-down list box.
If the overlay file you want does not appear in the overlay list, select the Edit button and Load
Overlay, and select the Overlay file.
If you have stored the overlay file you want to use in an external source, you can also load the file
when you access the Load Overlay window.
After you select the file, select Open. The file appears in the Overlay List box and is available for
printing. Select the overlay from the Overlay List box.
2. If necessary, select Confirm Page Overlay When Printing. If this box is checked, a message
window appears each time you submit a document for printing, asking you to confirm your wish to
print an overlay on your document.
If this box is not checked and an overlay has been selected, the overlay automatically prints with
your document.
3. Select OK.
Deleting a Page Overlay
1. Select Edit from the Overlay drop-down list. The Edit Overlay window appears.
2. Select the Overlay you want to delete from the Overlay List box.
3. Select Delete Overlay. When a confirming message window appears, select Yes.
4. Select OK.
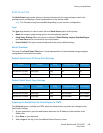
Output Options
Select the required Print order from the drop-down list box:
• Normal: All pages are printed.
• Reverse All Pages: Your printer prints all pages from the last page to the first page.
• Print Odd Pages: Your printer prints only the odd numbered pages of the document.
• Print Even Pages: Your printer prints only the even numbered pages of the document.
Select the Skip Blank Pages check box if you do not want blank pages to be printed.
To add a binding margin, select the Manual Margin check box and select Details to select the margin
position and width.