


• 2-43 • RMAN-QLS-002 rev. A Repair Procedures
media coveR, QL 220- RK18236-1 & QL220 pLuS- RK17735-015
You must use an ESD strap and work at a properly grounded workstation (antistatic mat or
tray). All electronic components must be placed on an ESD protective tray. If stored,
any electronic components must be placed in antistatic bags.
Tools Needed
#1 Phillips head screwdriver
3
/
32
” Hex Driver
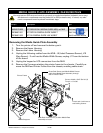
Removing the Media Cover
1. Turn the printer off and remove the battery pack.
2. Remove the Upper Housing.
3. Press the latch release button and open the Media Cover as though loading me-
dia. Remove any media from the printer.
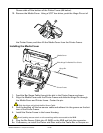
4. Remove Printer Chassis from the Lower Housing. Retain the screws.
5. Unlock the connector and remove the Bar Sense Cable from J2 on the MLB.
Carefully peel the Bar Sense cable from the bottom of the Printer Chassis.
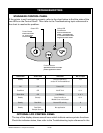
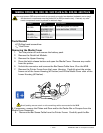
6. Press the Hinge Pin out of the Printer Chassis and remove the Media Cover. Use
the 3/32” hex driver to get the pin started. Lift the Media Cover from the Printer
Chassis.
7. If necessary, remove the Platen and Gear and/or the Peeler Bar or Scraper
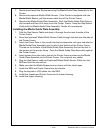
Installing the Media Cover
1. Feed the Bar Sense Cable through the slot in the Printer Chassis as shown.
2. Align the Media Cover with the Printer Chassis and slide the Hinge Pin through
the Media Cover and Printer Chassis. Center the pin.
Slide the hinge pin behind the Bar Sense Cable.
3. Peel the backing off the bar sensor cable and adhere it in the groove on the bot-
Media Cover
Hinge Pin
Slide the pin behind the
Bar Sensor cable.
Feed Bar Sensor cable through this slot.
Printer Frame