


RMAN-QLS-002 rev. A Repair Procedures • 2-104 •
Introduction
You will need to replace the MLB if it has been determined that it no longer functions
properly. This procedure covers installation of MLBs with either 1M/1M or 2M/2M
SRAM/Flash Memory congurations.
You must re-load the printer’s application les and re-calibrate the printer after replac-
ing the MLB.
Remember that if you change the MLB type from what was originally installed on your
printer, you must also change the printer’s conguration label.
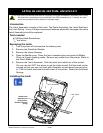
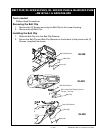
Removing the MLB
1. Turn the printer off and remove the battery pack.
2. Remove the QuickLink Module.
3. Remove the Top Cover.
4. Remove the Keypad.
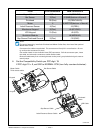
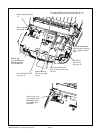
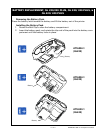
5. Unplug all remaining cables from the MLB as shown below.
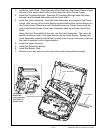
6. Remove the MLB. Remove the remaining Screw securing the MLB. Pull the
MLB out of the printer.
Installing the MLB
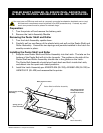
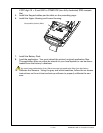
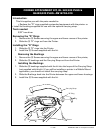
1. Slide the replacement MLB into place on the Lower Housing. Insure that the
board is pushed up under the retainer features and sits on the locator pin in the
Lower Housing. Secure in place with (1) of the Screws supplied in the kit where
shown. Ensure that the tab on the Latch Lock slides through the head open de-
tector without interference.
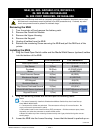
2. Plug in the printer cables per the following table:
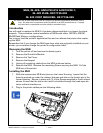
You must use an ESD strap and work at a properly grounded workstation (antistatic mat or
tray). All electronic components must be placed on an ESD protective tray. If stored,
any electronic components must be placed in antistatic bags.
mLb, QL 420- an16753-016 & RK18228-1;
QL 420 pLuS- RK17735-002
QL 420 coSt Reduced- RK17735-029