


RMAN-QLS-002 rev. A Repair Procedures • 2-48 •
media guide pLate aSSembLy, QL220/220 pLuS
Kit p/n Description Type
AN16972-007 KIT REPAIR QL2 MEDIA GUIDE PLA Rack and Pinion
AN16972-023 KIT REPAIR QL2 MEDIA GUIDE ASSy w/ MW Rack and Pinion
RK18467-001 KIT RPR QL2 MEDIA GUIDE W/BELT Belt/ Linered Medai
RK18467-002 KIT QL2 MEDIA GUIDE LNL W/BELT Belt/Linerless Media
1. Turn the printer off and remove the battery pack.
2. Remove the Upper Housing.
3. Remove the Lower Housing.
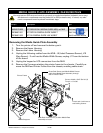
4. Unplug the following cables from the MLB: J5 (Label Presence Sensor), J10
(Gap Sensor). If unit has the Media Width Sensor, unplug J11 from the bottom
of the board.
5. Unplug the keypad or LCD connectors from the MLB.
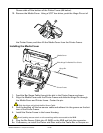
6. Remove the 2 screws retaining the printer frame to the chassis. Carefully re-
move the MLB and Printer Frame from the chassis, avoiding cable strain.
Screw, #4-40 x 3/16” Skt Hd. (2)
Torque = 5 in/lbs
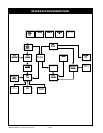
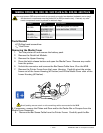
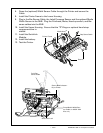
Dress Peel Sensor and Media Width Sensor
cable from Media Plate Assembly through
slot in Printer Frame.
Printer Frame
Press Latch Lock here to
test locking feature.
Slide Rack Lock this way to allow Media Plate
Assembly to locate.
Media Supports
You must use an ESD strap and work at a properly grounded workstation (antistatic mat or tray).
All electronic components must be placed on an ESD protective tray. If stored, any elec-
tronic components must be placed in antistatic bags.