


• 2-109 • RMAN-QLS-002 rev. A Repair Procedures
Introduction:
This kit supplies you with the parts needed to:
• Replace the “D” rings supplied as standard equipment with the printer. or
• Install the bushings supplied for use with the optional carrying strap.
Tools needed:
3/32” hex driver
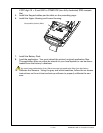
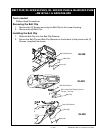
Removing the “D” Rings
1. Remove the (2) Screws securing the upper and lower covers of the printer.
2. Slide the (2) “D” rings out from the Printer.
Installing the “D” Rings
1. Slide the (2) “D” rings into the Printer.
2. Install the (2) Screws supplied with the kit.
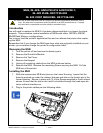
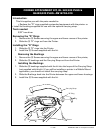
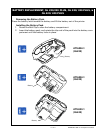
Removing the Bushings
1. Remove the (2) Screws securing the upper and lower covers of the printer,
2. Slide the (2) bushings and the Carrying Strap out from the Printer.
Installing the Bushings
1. Slide the (2) bushings supplied with the kit into the loops of the Carrying Strap
(not supplied with this kit.) If you will be installing a printer in a Mobile Mount
application, you should not install the carrying strap.
2. Slide the Bushings back into the Printer between the upper and lower housings.
3. Install the (2) Screws supplied with the kit.
coRneR attachment Kit, QL 320/320 pLuS &
QL420/420 pLuS- an16753-010
Bushing
“D” Ring
Screw
Carrying Strap