


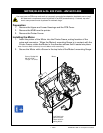

RMAN-QLS-002 rev. A Repair Procedures • 2-90 •
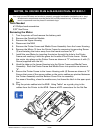
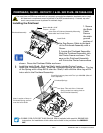
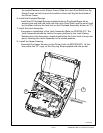
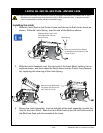
nector latch as shown at “1”.
2. Plug in the Label Present Sensor
Dress the ex circuit from the Label present sensor under the latch lock and
plug it into J5 of the MLB as shown at “2”. Close the connector latch.
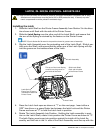
3. Secure the Gap Sense ground strap
Secure the ground strap from the Gap Sense cable to the printhead heatsink
with the retained Phillips head screw as shown at “3”. A spare screw is sup-
plied with the Printhead replacement kit.
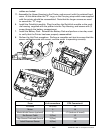
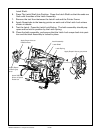
4. Install the Printhead Assembly
Insert the left hand tab of the printhead into the slot on the Printer Frame As-
sembly (“4”). Rotate the printhead into the slot on the other side of the Print-
er Frame at “5”.
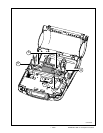
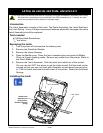
5. Install the Latch Shaft
Install the Latch Spring (removed with the Latch Assembly) over the right
hand side of the Latch Pivot Shaft. Hold the Latch Assembly at an angle
to the Printer Frame (“1”) with one leg of the Latch Spring captured behind
1
2
4
5
3