


AT-WA7500 and AT-WA7501 Installation and User’s Guide
215
Using the
Rejected List
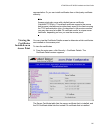
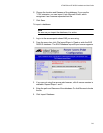
The Rejected List screen displays the users and devices that have been
rejected by the EAS. You can use this list to discover which users and
devices may need to be added to the database. When using the web
browser interface, you can immediately add previously rejected end
devices to the database. You do not need to click Submit Changes or
reboot the access point.
Note
When you reboot the access point, the rejected list is cleared.
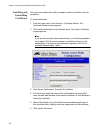
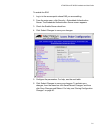
To view the rejected list
1. Log in to the access point whose EAS you are using.
2. From the main menu, click Security > Embedded Authentication
Server > Rejected List. The Rejected List screen appears.
3. Determine which users and devices you need to add to the database.
For help understanding the list, see the next table.
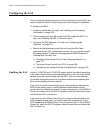
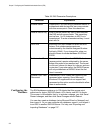
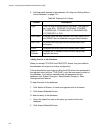
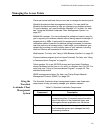
802.1x
(TTLS/
PEAP)
Enter the login name and
password of all end
devices that are authorized
to communicate with the
802.1x-enabled network.
For more security, you
should delete the user
name “anonymous” and
the password
“anonymous.”
End device
login name
End device
login
password
802.1x
(TLS)
Enter the client certificate
common name of all end
devices that are authorized
to communicate with the
802.1x-enabled network.
Client
certificate
common
name
None
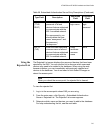
Table 59. Embedded Authentication Server Entry Descriptions (Continued)
Type Field Description
User Name
Field
Password
Field