


Installation and Getting Started Guide
4. Click on the General
link to display the IP configuration panel.
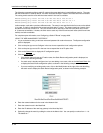
5. Click the Static Route
link.
• If the device does not have any IP static routes, the Static Route configuration panel is displayed.
• If a static route is already configured and you are adding a new route, click on the Add Static Route
link
to display the Static Route configuration panel.
• If you are modifying an existing static route, click on the Modify button to the right of the row describing
the static route to display the Static Route configuration panel.
6. Enter the network address for the route in the Network field.
7. Enter the network mask in the Mask field.
8. Select the next-hop type. You can select one of the following:
• Address – The next-hop is the IP address of a gateway router.
• Interface – The next hop is a port, loopback interface, or virtual interface on the routing switch.
9. Enter the next-hop IP address (if you selected the Address method) or select the interface (if you selected the
Interface method).
• Address – Enter the IP address of the next-hop gateway in the Next Hop (by Address) field.
• Interface – Select the port, loopback interface, or virtual interface from the Next Hop (by Interface) field’s
pulldown menu(s). Loopback interfaces and virtual interfaces are listed in the Port pulldown menu, not in
the Slot pulldown menu. To select a loopback interface or a virtual interface on a Chassis device, ignore
the Slot pulldown menu and select the interface from the Port pulldown menu.
10. Optionally change the metric by editing the value in the Metric field. You can specify a number from 1 – 16.
The default is 1.
NOTE: If you specify 16, RIP considers the metric to be infinite and thus also considers the route to be
unreachable.
11. Optionally change the administrative distance by editing the value in the Distance field. When comparing
otherwise equal routes to a destination, the routing switch prefers lower administrative distances over higher
ones, so make sure you use a low value for your default route. The default is 1.
12. Click the Add button to save the change to the device’s running-config file.
13. Repeat steps 8 – 12 for each static route to the same destination.
14. Select the Save
link at the bottom of the dialog. Select Yes when prompted to save the configuration change
to the startup-config file on the device’s flash memory.
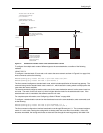
Configuring a “Null” Route
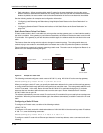
You can configure the routing switch to drop IP packets to a specific network or host address by configuring a “null”
(sometimes called “null0”) static route for the address. When the routing switch receives a packet destined for the
address, the routing switch drops the packet instead of forwarding it.
To configure a null static route, use the following CLI method.
USING THE CLI
To configure a null static route to drop packets destined for network 209.157.22.x, enter the following commands.
HP9300(config)# ip route 209.157.22.0 255.255.255.0 null0
HP9300(config)# write memory
Syntax: ip route <ip-addr> <ip-mask> null0 [<metric>] [distance <num>]
or
Syntax: ip route <ip-addr>/<mask-bits> null0 [<metric>] [distance <num>]
6 - 40