


Installation and Getting Started Guide
2. Click on the plus sign next to Configure in the tree view to expand the list of configuration options.
3. Click on the plus sign next to RIP in the tree view to expand the list of RIP option links.
4. Select the Route Filter
link.
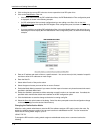
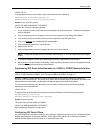
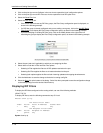
5. Select the Filter Group
link.
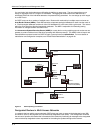
• If the device does not have any RIP filter groups, the Filter Group configuration panel is displayed, as
shown in the following example.
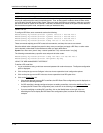
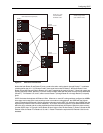
• If a RIP filter group is already configured and you are adding a new group, click on the Add RIP Route
Filter Group link to display the Filter Group configuration panel, as shown in the following example.
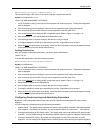
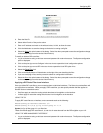
• If you are modifying an existing RIP filter group, click on the Modify button to the right of the row
describing the group to display the Filter Group configuration panel, as shown in the following example.
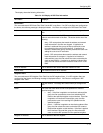
6. Select the port (and slot if applicable) to which you are assigning the filter.
7. Select either or both the In Filter and Out Filter options.
• Selecting In Filter applies the filters to all RIP updates received on the port.
• Selecting Out Filter applies the filters to all routes advertised on the port.
• Selecting both options applies the filters to both incoming updates and outgoing advertisements.
8. Click the Add button to save the change to the device’s running-config file.
9. Select the Save
link at the bottom of the dialog. Select Yes when prompted to save the configuration change
to the startup-config file on the device’s flash memory.
Displaying RIP Filters
To display the RIP filters configured on the routing switch, use one of the following methods.
USING THE CLI
To display RIP filters, enter the following command at any CLI level:
HP9300> show ip rip
RIP Route Filter Table
Index Action Route IP Address Subnet Mask
1 deny any any
RIP Neighbor Filter Table
Index Action Neighbor IP Address
1 permit any
Syntax: show ip rip
7 - 16