


Installation and Getting Started Guide
HP9300(config)# write memory
Syntax: [no] router rip
USING THE WEB MANAGEMENT INTERFACE
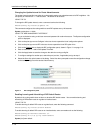
1. Log on to the device using a valid user name and password for read-write access. The System configuration
dialog is displayed.
2. Select the Enable radio button next to RIP.
3. Click the Apply button to apply the changes to the device’s running-config file.
4. Select the Save
link at the bottom of the dialog. Select Yes when prompted to save the configuration change
to the startup-config file on the device’s flash memory.
Changing the RIP Type on a Port
When you enable RIP, RIPv2 is enabled on all ports by default. You can change the RIP type to one of the
following on an individual port basis:
• Version 1 only
• Version 2 only (the default)
• Version 1, but also compatible with version 2
Use one of the following methods to change the RIP type supported on an individual port.
USING THE CLI
To change the RIP type supported on a port, enter commands such as the following:
HP9300(config)# interface ethernet 1/1
HP9300(config-if-1/1)# ip rip v1-only
HP9300(config-if-1/1)# exit
HP9300(config)# write memory
Syntax: [no] ip rip v1-only | v1-compatible-v2 | v2-only
USING THE WEB MANAGEMENT INTERFACE
To change the RIP version on an individual port:
1. Log on to the device using a valid user name and password for read-write access. The System configuration
panel is displayed.
2. Click on the plus sign next to Configure in the tree view to expand the list of configuration options.
3. Click on the plus sign next to RIP in the tree view to expand the list of RIP option links.
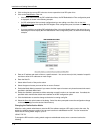
4. Click on the Interface
link to display the RIP interface table.
5. Click on the Modify button in the row for the port.
6. Select the RIP version from the pulldown menu. The default is version 2.
7. Click the Apply button to save the change to the device’s running-config file.
NOTE: To apply the changes to all RIP interfaces, select the Apply To All Ports button instead of the Apply
button.
8. To configure settings for another port, select the port (and slot, if applicable) and go to Step 6.
9. Select the Save link at the bottom of the dialog. Select Yes when prompted to save the configuration change
to the startup-config file on the device’s flash memory.
7 - 4